
Run Management
Runs are the instances of shuttle movements on the different routes, and a run encompasses the different sectors, times, and prices.

To move quickly to one of the main sections, just click on the links below. Or, scroll on to read the entire document.
Route Operator
A Route Operator is a SHUTTLE OPERATOR business (yours, or external) which provides the various shuttle runs on the different routes.
Maybe your business performs all of it's own shuttle operations. In that case, set up one operator, perhaps call it Own, or yourbusinessname.
If you have connections to more than one shuttle operator that provides services to you, set each of them up here.
The Route Operator button takes you directly to the Route Operator settings in Administrator settings here
These route operator entries form a drop down list which becomes available in Resources.

To add a new Route Operator
- Click the + Operator button


- Each Route/Shuttle Operator can be allocated to a single trail, or multiple trails, and can have up to four different rate labels. These labels can be defined by your organisation, per shuttle operator. In the example above, Bill's Ultimate A2O shuttle, has four differing rate labels. Other examples of rate labels could be Senior, Adult, Child, or Winter Rate.
The Rate label is used in the Shuttle Movement screen when setting up a Departure or Booking.

TIP: The rates themselves are managed in Resources | Routes | Route timetables and Rates
The status of each shuttle operator can be set to active or inactive.
To edit a Route Operator
- Click once on a record to change it.
Runs
Runs are the various SHUTTLE RUNS of your shuttles. Each/Run is specific to a shuttle OPERATOR. In the GIF below, the RUN is A-G

If a shuttle runs five times per day, you need one entry for each of those five shuttle runs. (We recommend you include a time or some sort of unique identifier in your description.)
Each time specific run that an operator performs needs to be added into Odyssey. This is done in the Resources | Routes | Route Timetables and Rates area.

To add a new run
- Click the + Run button

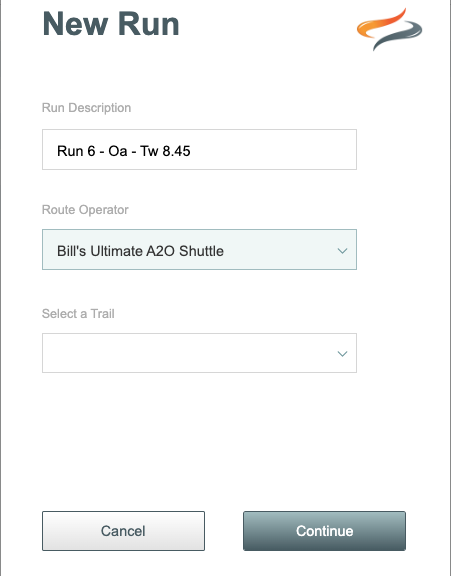
- Enter a description for your run
- Choose the Route Operator from the drop down list
- And select a trail from the drop down list
- Click Continue
Run Detail
The Run details screen will be pre-populated with the settings you chose in the previous step.

You can override any of those details here.
- Select the trail or trails that a shuttle run is available on, by ticking them. Note that a shuttle run can be available on multiple trails.
- The status can be changed from Active, Archived or Deleted
- The notes field can be used for explanatory notes.
Runs Maps/Calendars
As the Runs are displayed in the various different Depot Calendar views, it is helpful to assign a different colour for each run, or area, to help you identify them.

- Enter the District Start and District End for mapping purposes.
- In the Calendar info field, write a SHORT description for this route (eg MTC 4pm) which appears in the Calendar, enter the departure and expected arrival times, and approximately how long the drive is expected to take. This gives an INDICATION of driver hours, but Odyssey is not measuring driver hours.
- Enter the colour that this run should be displayed with on the Runs calendar.

Example of the run calendar colours in use
Run Timetable
The timetable lists all of the different sectors in this run - i.e. the stopping points along the way. In the GIF below, the SECTORS are A-B, B-C, C-D, etc. The Sector function allows you to create price and time details that you offer for a passenger to get a shuttle ride between locations on this run.

Create a new timetable for each Shuttle Run by clicking the + Sector button


Don't be confused by Bag movements. Although bags are still travelling on the shuttle, their movements and charges are taken care of in the bag movements area, and are controlled by accommodation provider bookings.
- Enter a Description to describe this sector of the run. e.g. in the example below, Twizel-MtCook
- Enter a Departure time. This field is compulsory. It's important to enter the hours and minutes, otherwise this sector will not populate in lists correctly. If you can't be certain of the time, we recommend you at least enter 0:00 am, and label the sector [ Variable Time ] or similar.
- Enter a Description for this sector of the run to appear in drop down lists.
- Enter a short code to be used in Drop Down lists,
- Enter the Town/District to and from
- The status of the timetable product can be Active, Archived, or Deleted
- Enter the Minimum charge
- Enter a general ledger account number in the account code field, for costing financial transactions to that department
- The Depot use tick is used where the route will be used by the Depot. This has the purpose of shortening route drop down lists for the depot team, as Long-Haul routes might have an earlier booking date, rather than a spontaneous/counter sale, and therefore may not be appropriate for a WalkIn.
- Click Close
Run Sector Notes

- Every Sector can have it's own set of Notes for the Office or Itinerary. This is a flexible space for entering a range of notes or relevant information.
- Enter Notes for the office in Notes - Office field.
- Then, by clicking on Notes - Itinerary, the Notes space opens up for you to enter Notes which could go on the Itinerary, if you choose. This could be to advice your customers to be there 15 minutes before departure, or what the travel time is to the next destination.
- Click to enter a relevant website URL
- Click to add a photo
- Enter a general ledger account into the the Account Code field so that financial transactions for this route product are coded to the correct area of your accounts.
Run Rates
Rates can be set for each shuttle run, for customised periods, for example so that you can have a separate rate for an off peak or shoulder season.

Rates are season and date range specific. This enables you to have more than one price for any of your four Rate Labels in any one Season. e.g. in September-February of the 21/22 season, you may have one price for Adults, another for Children and Seniors, and from March-July of the 21/22 season, a lower price for Adults, Children and Seniors.
To display any existing rates already set in Odyssey
- Click on the Rates Tab, and choose the SEASON, and a DATE from the drop down lists on the right hand side of the screen

To add new Run/Sector Rates
- To add a new Rate, you first need to ensure that the date range you are adding prices for has been created.

- If it has been, all you need to do is click in the spaces for the price, and enter them in!

- If not, you need to create the new date range first:
- click the + Dates button


- Select the season for this rate from the drop down menu
- Enter the rate effectivity dates ( Date start and Date end) from the calendar button in each field
- Click Continue
- Then, select that range from the drop down menu

- Now all you need to do is enter the prices in the spaces for each Rate.