Tour / Departure - Movements
This page is currently being replaced by separate pages on each movement type.
A movement can be in relation to People (e.g. Shuttle movement), custom, bags, bikes, or vehicles
Learn more about movement types Here
The information showing here comes directly from the Trip master that this Departure is based on, and also from the Daily locations screen that has been previously populated. Any changes you make here before Bookings are added to the Departure, will automatically be applied to each new Booking as it is created.
Here's the new page on Custom transfers
https://support.myodyssey.app/article/657-tour-movement-custom-shuttle
Here's the new page on Shuttles
https://support.myodyssey.app/article/699-tour-departure-movement-shuttles
There is now a new separate page for Tour level Bag movements, here
there is now a separate page for Tour level Vehicle movements
The following screens all have some common elements
Refreshing the Departure from the Master
If you have made changes you aren't happy with, and wish to reset this Departure's movement records with those from the Master, click the Update from Master button.
Note: existing records on this Departure are replaced using this function

Starting over
If you don't want to use the default Master shuttle records, or have made changes you aren't happy with, and wish to start over with no Movements at all, click the Start over button

3 Day View
For a full schedule of any movements on this Departure, click the 3 day view button
Note: the fill down buttons have been removed from the bag movement layout. Please use the ' Apply to All' button on the previous screen to apply the automation of copying Bag movements across all PAX in the Trip.

SPEED TIP: From this view, new records can be added by clicking into a specific day. This opens up the a new "movement" window for you to complete. Then once you have completed this for one booking on a departure, you can fill down this selection from the TOP ROW client, onto all Clients on this Departure, by clicking on the fill down button

The small green square icon to the left of the booking record indicates that the booking has been confirmed. Each Odyssey client has their own colour coding system to indicate the booking status. Learn more Here
Notes
Driver notes which are entered on the Departure (Pax, Bikes, Bags) will NOT be pulled thru onto each Booking, when the Refresh from Departure button is used. This is to avoid multiple iterations of the same text appearing on the manifest. If all bookings require the same drivers note, the driver will get that note from the Departure level note. Unique notes can be added to booking level drivers notes, as required.
To learn more about any specific movement, click a link below:
Bike
Bikes can be moved from one location to another, using Odyssey's Route management system. Bike movements need to be defined at Departure level first, and then selected for the clients at booking level.

To add a Bike Movement to this Departure
Create a new Bike movement for this Departure, by adding/defining it at SHUTTLE level
Read the section on adding a shuttle movement above. Any shuttle movements defined for this Departure are also available for bike movements.
TIP: If you attempt to add a bike movement by Click the + Bike button, you will get a message advising you to add it from the + Shuttle button on the shuttle screen
- Once movements have been defined at shuttle level, it is available for adding detail to on the Bike movement tab
- Step 1- Click on the orange Plus button on the bike movement record you wish to populate

- Step 2 - Enter the Bike Movement product (e.g. Return to base, or Hire Bike Transfer) you expect most of the group to use, and indicate whether this should be charged for at booking level.

- Enter any Notes. The Notes field is a transitional field. Click into it once the enter Office Notes
- Click on Notes - Driver, and then the Notes field changes for you to enter Notes for the driverClick on Notes - Itinerary, and then the Notes field changes for you to enter Itinerary Notes Click on Notes - Finance, and then the Notes field changes for you to enter Finance Notes
- IF the Accounting ( Xero API ) Advanced Module has been activated by Creative Technology for your Odyssey set-up, there will also be a General Ledger cost drop down list
To change an existing bike shuttle movement
- Click once on an existing bike shuttle movement (on the right hand side, where it goes orange when you hover over it) to edit it.
Using the fill down button

This fill down will copy the bike movement Product record from the first record down to any other existing records. It does not create new bike movement records, and will not function if the first record is empty. The charge tick, and any pricing override does not get filled down, as it is considered that each bike huttle movement is considered to be a unique instance.
Custom
This view is currently being upgraded. If your view doesn't look like the images below, please use this link to find Help instead: https://support.myodyssey.app/article/657-tour-movement-custom-shuttle
A custom Shuttle is used when a standard Shuttle time/date does not match the needs of a group booking. Custom Shuttles can be created and charged for to provide the flexibility or needs of the group booking. These are generally a private shuttle with no other 'non' group people able to book on it.
These are the flexible Departure level element that lets you pick when a group will be picked up, and moved somewhere else on the trail.
At the time of writing, custom shuttle settings are not defined at Master level. So set up your custom shuttle from afresh at Departure/Trip view, as there is nothing to be pulled in from the Master.
To add a Custom Shuttle to this Departure
- From the Departure | Movements | Custom tab

- Click the + Custom button

The Custom Movement screen appears

- Type a Description for this Movement
- Check that the date is correct, adjusting using the calendar tool if required
- Enter a start and end location from the drop down lists. These are freeform fields, so you can type "Queenstown", or even "outside the Pig and Whistle"
- Select the departure of the custom shuttle time from the hour and minute drop down lists, and set am or pm
- The charge tick will be off by default. Clicking the charge button will trigger the rate fields to appear
- Select a rate, either individual or split equally
If split equally is selected, enter a price in the Rate field, e.g. 100
Then select the number of people sharing the cost, e.g. 3, and Odyssey will calculate the per PAX price and display it to you

If individual is selected, enter a price per person in the Client Box

Enter the prices for Hire Bike, Own Bike and Bag movements
Tick/untick the following tick boxes as required:
- Charge for these items
- Agent commission calculation
- Print on the Itinerary. This is currently set to be on, by default.
- Show price on the Itinerary. This can't be ticked on, if you have unticked "Print on the Itinerary"
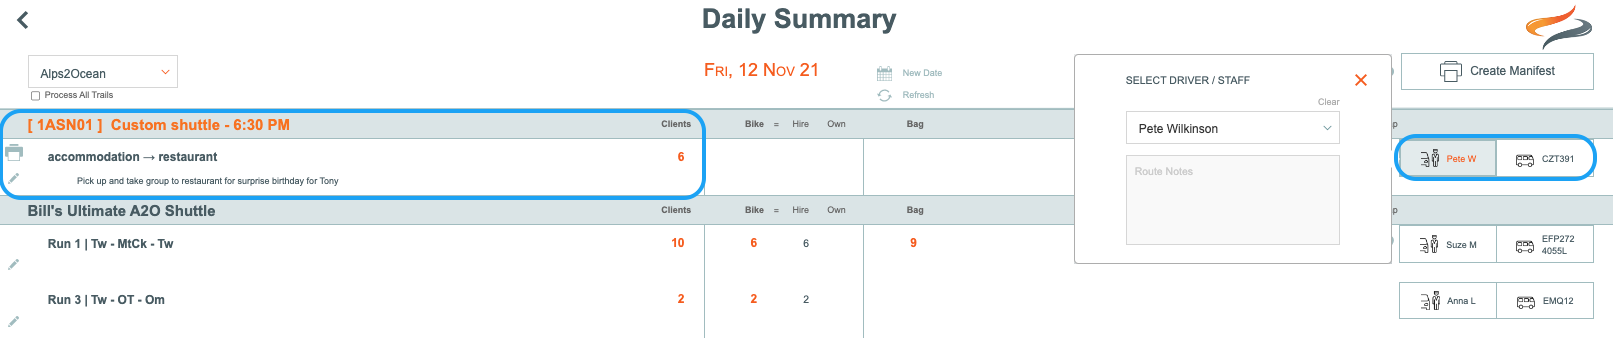
Notes
The notes tab provides you with an opportunity to record a range of notes, as well as driver and vehicle information.

- Enter any Notes. The Notes field is a transitional field.
- Click into it once the enter Office Notes.
- Click on Notes - Driver, and the Notes field changes for you to enter Notes for the driver Click on Notes - Itinerary, and the Notes field changes for you to enter Itinerary Notes Click on Notes - Finance, and the Notes field changes for you to enter Finance Notes
- Select the Driver from the drop down listSelect the Vehicle from the drop down list
- IF the Accounting ( Xero API ) Advanced Module has been activated by Creative Technology for your Odyssey set-up, there will also be a General Ledger cost drop down list
To change an existing custom shuttle movement
- Click once on an existing custom shuttle movement entry to edit it.