
Depot Daily Operations
The Dairy function is your access point to manage daily tasks, at a fine level of detail. From here you can see daily diaries for people, shuttles, bikes, and bags, and build a manifest.
This view provides a greater level of detail than the 7 day at a glance view, for example bag movements can be re-ordered, and a breakdown of movement types found, find unallocated bags, booking/client details etc.
- From the Main Menu | Depot | Operations
- select Manifest - 1 day:

- The Diary and Manifest ONLY show CONFIRMED and RELEASED bookings
To navigate quickly to any of the sections below, click on the item you wish to view
Making selections before you begin
Manifest - 1 day (including route map)
Making selections before you begin:
Before you make any selections from the Depot Daily Operations view, please follow these steps
From the Main Menu | Depot | Operations | Depot Daily operations:

Make a date selection
1. From the display selections options on the right hand side of the screen, select the date you wish to view

- Use the right or left arrows < > to navigate a day at a time OR
- Click into the calendar tool to make a larger jump in time

- use the double black arrows to navigate to different years, and the single black arrows to navigate by months
Make a trail selection
From the Display Selections menu on the right hand side of the screen

choose a Trail from the Trails drop down list, OR
- Tick the Process all Trails box to view briefings for all trails
- TIP: The trail you select here becomes the default trail for all simple calendars and other depot selections
Manifest - 1 day
Make date and trail selections as described above, then click the View Full Diary and Manifest button

At this point, OR when you select a new date...
- geo sorting will re-occur and create new sort sequences for runs, bag movements etc
- and you are then delivered to the Daily Summary page, read below
To learn about the Manifest, click Here
Daily Summary

The Daily Summary page lists:
- the various route runs required for this trail, for the client bookings and bike and bag movements on the date you have selected.
- A map button will show you the optimised route for this sector
- Drivers and Vehicles can be assigned at this level (up to two of each), along with any notes that have been recorded for the driver
- Total bag movement numbers
- For users of TrackPod, learn more here
- an icon which displays next to the PAX Shuttle qty. When clicked, it will promptly present a summary of the SECTORS being utilised on that particular Run. Note this feature works for PAX data only... it is not reporting any Bike movements
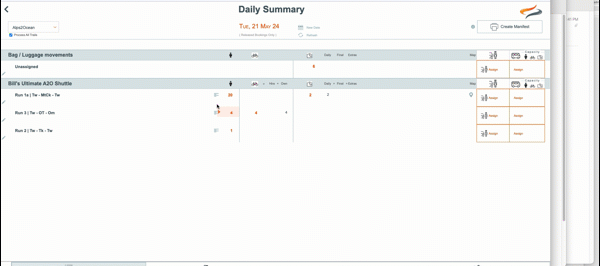
- This page is sorted by Shuttle Operator, by time.
- If required, change the trail from the Trail drop down list, or choose to view All Trails by clicking the Process all Trails checkbox
- Change the date from the date menu by clicking on the calendar tool, and navigating to a new date, then pressing the Refresh button

Map functionality
The map button allows you to view the optimised route for this sector of the trip.

The route is uniquely optimised based on the location of the provider that bags are being moved TO.
To view the map route
- Click once on the map pin

- A Google Map view of the route appears.
- This route has been optimised by Google, based on all of the providers destinations for this route.

You can also download the locations and all directions to an email account or cell phone from this map view.
To send directions to your phone
- click the link at the bottom left hand corner of the map screen
You need to be logged into a Google account when you download the directions. We suggest that the Depot Manager, or whoever is despatching the vehicles, is logged into their Google account. The optimised route instructions will then go to their phone, and the Depot Manager can then copy and paste those instructions to the driver's mobile number
Navigating around the Diary

In addition to the full summary screen, you can also view detailed lists of shuttles, bike movements, custom movements, bag and vehicle movements for this day.
All of those screens have the following common elements:
Summary view/Clients View

The Summary or Clients buttons allows you to toggle between these two display options. By switching to Clients view, you are able to see the names of clients on each departure, along with the organiser names, and mobile numbers
Date Selection

Change the date at this view, if required
- Click on the calendar field, then use the arrows to navigate to the selected date
Change the Trail
- Select a different trail from the drop down menu

Drivers and Vehicles can be assigned at this level
Assign People
Up to two staff members can be assigned drivers
- To assign a staff member, click once on the Assign Person button


- Select the driver or staff name from the drop down list of names. Learn how to make a staff member appear on the driver list Here
- If required, add a second driver from the second drop down list

- Add or edit any Route specific Notes for the driver here
- Note that when the Driver has been assigned, the icon no longer has the word "assigned" beside it.
- And if a note has been made, a pencil icon will show

Assign Vehicles

- To assign a vehicle, click once on the Assign Vehicle button
- Select the a vehicle from the drop down list of vehicles, as well as an second optional "vehicle" type such as a bike trailer
- Add or edit any Route specific Notes here. "Beware of slips due to recent heavy rain"

Note that when the Vehicle has been assigned, the icon will include the Vehicle short code
And if a note has been made, a pencil icon will show
Switch views
From any view you can switch to another view by clicking on it

People Movements
The People Diary shows a list of Departures, sorted by Operator, by Route Sector. You can see the Departure code, the Departure name, the number of people and the departure time.
To move a group of people from one shuttle to another
- click on the client record you wish to change (you will see the record change colour to orange as you hover over it

A pop up window will appear, allowing you to select a different shuttle from the drop down list.

- If you are moving all the clients, leave the tick on "Change All x Clients on this Trip?"
- If you are also moving all associated bike records, leave the tick on "Move all associated Bikes at the same time?"
- Select the new shuttle time from the drop down list
- Click the Apply button
Your client/s and optionally, their bikes have now been moved

To see a Client sheet for any of the Departures, click once on the Departure in the list.
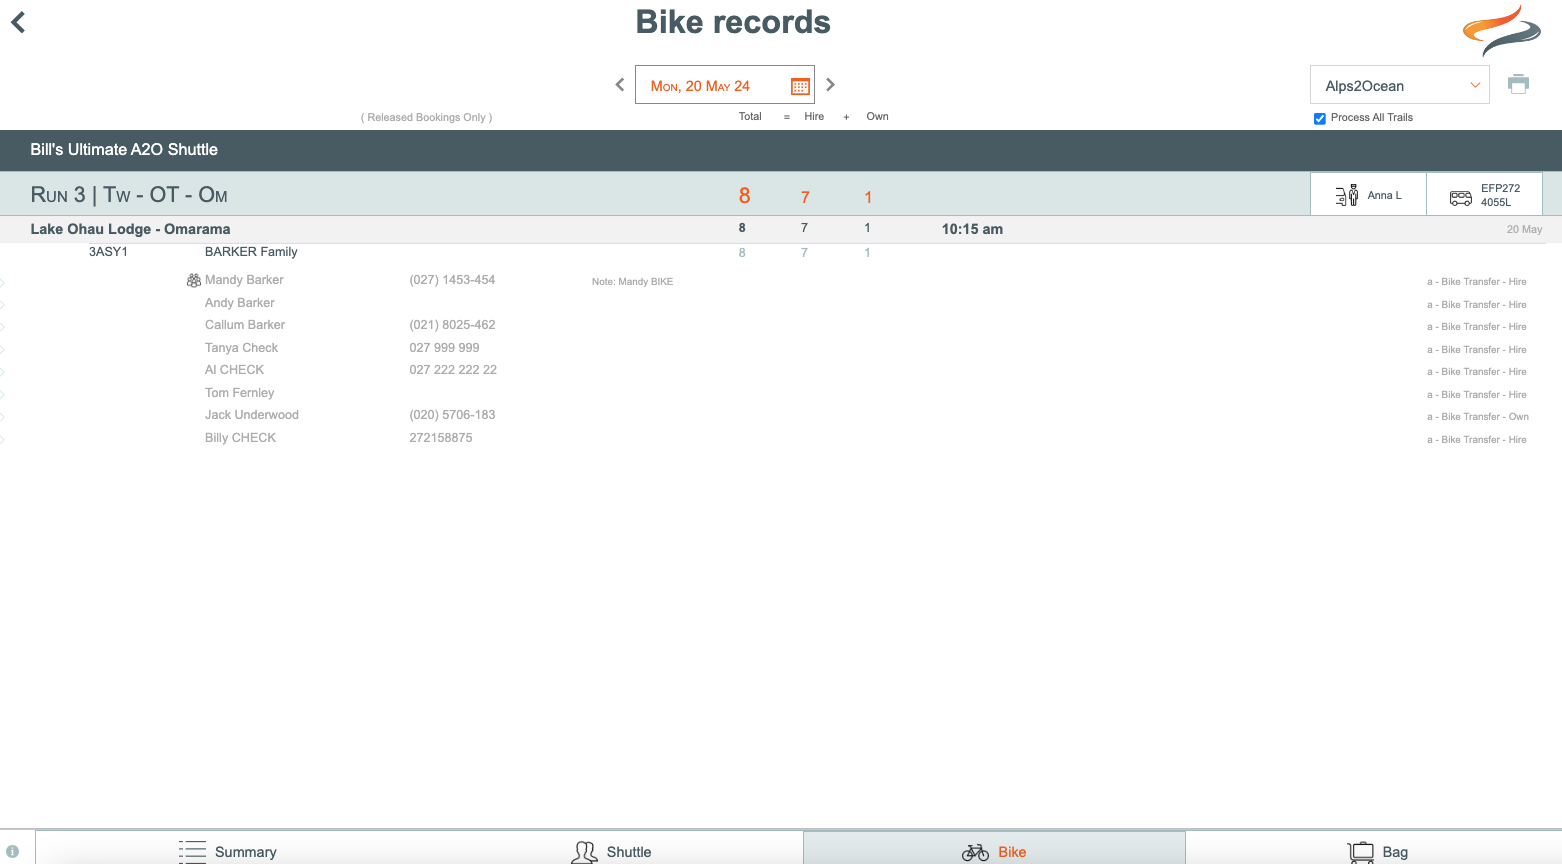
Bike Movements
The Bikes Diary shows a list by Operator, by Route Sector, of each departure, the names of the clients and their contact numbers, along with the number of Bikes (split into hire and own) on the departure, and the time of the departure, and the bike movement rate which is applied.
To assign a driver, or vehicle for the bike movement run
Clicking on the run heading allows you to open up a window, where you can assign a driver, record some route notes. You can also assign up to two vehicles.

To swap a bike movement from one shuttle to another
- click on the bike movement record you wish to change (you will see the record change colour to orange as you hover over it), and click change
-
select a different route from the drop down list which appears

Custom Movements
The Custom Diary shows a list of Custom shuttles, the to and from locations, along with the number of people on the departure, and the time of the departure. Notes from the driver are pulled through from the booking. The regular manifest view does not include Custom shuttle information, such as Notes, bag or PAX counts.
To learn more, go to the separate page here
Bag Movements
- If there are no bag movements on this day, the Bags button at the bottom of the summary page will not display, or cannot be clicked to view the page.
- The Bags Diary shows a list of Bag movements required on this Trail, sorted by Operator and Run. Each movement details the Pick up location, and the drop off destination, along with the Departure number and name, and number of bags.
- Manual address fields are those that are written in orange text. Learn more about manual addresses Here
- For a more detailed breakdown by client, click on the Clients View button, as described above

Resequencing bag movements
- Odyssey automatically calculates the movements for your bag runs, based on geo-sequencing of the pick up locations. However, if depot staff wish to override this, and manually control the bag run sequence they can do so.
- Reservations staff are able to see the sequence of bag movements on the Booking level | Bag movement tab
- To manually resequence a bag run: Clicking on any of the orange numbers, or even just hovering over the area these numbers would be displayed (in the case of an un-sequenced list) will provide the popup window, where new sequence selections can be made.

- Make the new selections from the drop down list, and click Apply
- NOTE: this process will NOT resequence any other bag movements; e.g. it will not insert these bags currently being resequenced in between other numbers. The user can move other numbers, up or down, to sort the list into the correct order. You can have multiples of a number if you are happy with the ordering, e.g. if you are happy with the Pick-up / Drop-off sequence
- Once a bag run has been sequenced by an operations team, a note will be displayed on each Tour level bag movement to help other staff avoid making unintentional changes. If changes are made, this message will prompt them to advise the operations team that further adjustments are needed.

- If a bag movement has been added by other staff after a run has been sequenced, a "new" flag will appear beside the newly added bag record

To move bags from one shuttle to another
- Click the Change Run < button on the bag movement record you wish to change (as you hover over the button you will see the button change colour to orange highlight). From the drop down list, choose a different route.

- Click Apply
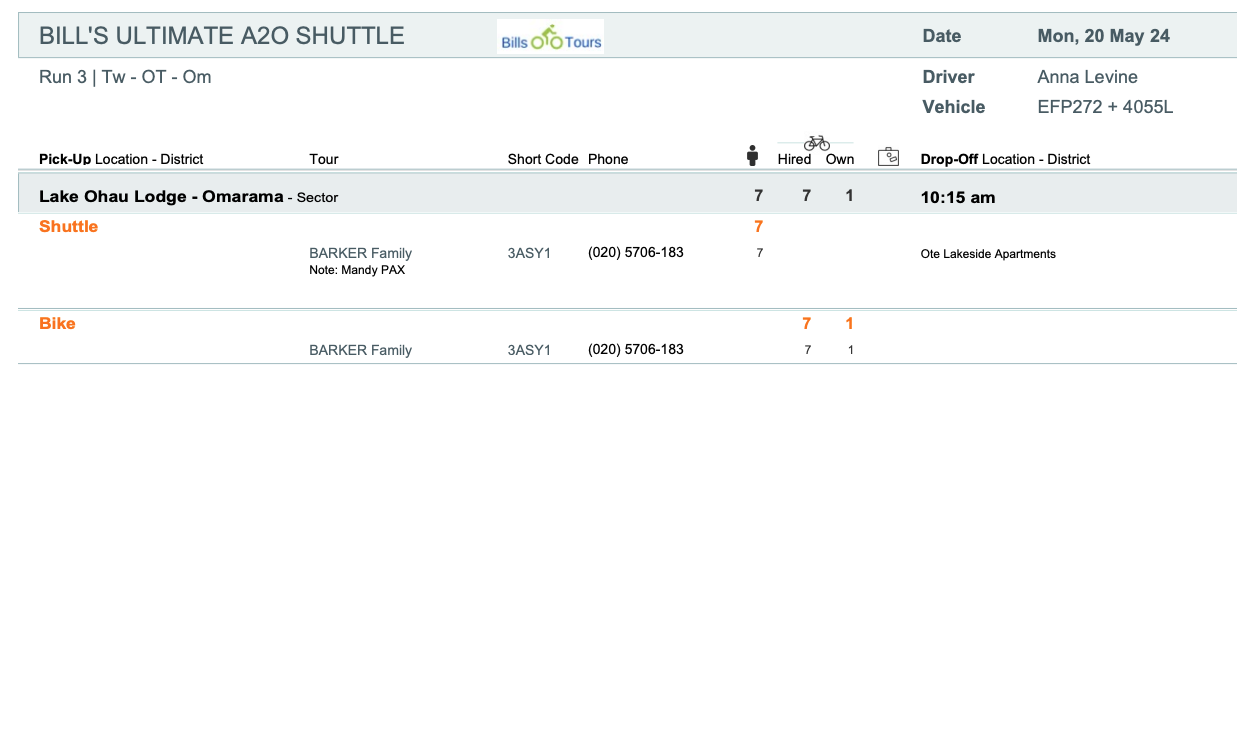
View client sheet
- To obtain a copy of the "Client Sheet" for this departure, Click the View Client Sheet button on the group's bag movement record (as you hover over the button you will see the button change colour to orange highlight).

To learn more about viewing paperwork like this, click Here
Vehicles Storage and Relocations
The Vehicle Diary shows a list of vehicle relocations by Route Sector, for each departure, along with the time of the departure.

Vehicle Relocations
Tip: If there is a vehicle relocation required on this day, an orange banner at the top of your daily summary will alert you to this.
- Click the Vehicle tab to make the necessary change

Hover over the > button to open up a window, where you can assign a driver, note the Vehicle make, colour and rego, change a movement time, and leave notes for the driver or office staff. The date can be adjusted if required, too.


Vehicle Storage
Hover over the record till it goes Orange, then click anywhere on the record to open it up and make any changes.

In the window that appears you can note the Vehicle make, colour and rego, leave notes for the driver and/or office staff. The date can be adjusted if required, too.