
Create an Itinerary
The Itinerary is one of the Paperwork options; it can be created at Reservation team level, or viewed the Depot level. The Itinerary can be created for everyone on the Departure, or just for individual bookings.
Learn more about other paperwork outputs/reports Here
The Itinerary can be printed, or stored and emailed to the client using the email tab.
To learn how to SET UP the Itinerary (e.g. where & how to populate the Provider info), learn more Here
To learn more about how to create the .pdf itinerary, store it, download or email it, click Here, or view our Webinar on Itineraries, Here
The Itineraries text content and settings are initially set up on each individual Master, as well as at Provider and Provider product, Movement, and Depot, Routes and Shuttle's settings. When a Departure is created it pulls through the itinerary content from all of those locations. The content can then be added to and modified at Departure level - within the Departure and Booking level, and also in the Itinerary creation carousel.
Individual Movements such as shuttles, bag, transport, etc. can be turned on or off, and have additional notes added directly in the itinerary
Morning and Afternoon Text and end of day locations can be turned on or off, and edited, directly in the itinerary. The headings can be customised too.
Welcome text and Footer text, can be edited or added to, directly in the Itinerary
Inclusion text can be turned on or off, and can be edited or added to, directly in the Itinerary
Providers can be turned on or off, and have additional text added for this departure, in italics, above the regular Provider text,
the order of events can be controlled by the time each event is set for, and displaying the time can be turned on or off
Create an Itinerary

- From the Tour | Output/Emails tab, select Itinerary
- The Itinerary can be created :
- as a Personalised Itinerary for individual clients on your tour, tailored to their own trip specifications
- as a Tour level Itinerary, designed for all members of the Tour

To create a personalised Itinerary
- Click in a tickbox to select the client/s for whom you wish to create an Itinerary
- Tip: the clients who are sharing a room together are indicated by the different room colours used in the Connections view, in this example Mandy and Andy are sharing a room, as are Frank and Jack.
- Note that when you click in a tickbox, the Edit button will appear, which will enable you to go to the carousel view, for editing and personalising then storing the client's itinerary even further. Learn more about the carousel view below.
- Click the Personalise button
- You will be given the opportunity to rename the stored Itinerary, which is particularly useful if you are sending a personalised itinerary to a subset of clients on the Tour. In this case, three clients are receiving the same Itinerary, so we renamed the Itinerary (which was originally named after the Tour description, "Barker family" ) to "Mandy, Andy and Callum's Itinerary".


- If selecting Personalised, the unique Itineraries will be stored automatically.
- This may take a couple of minutes to complete, depending on the number of Clients and Days involved in the Tour
- All content specific to these clients will be included in their Itinerary, including any pre or post days specific to these clients. These days will not show for other clients.
- When sending emails with an Itinerary attached, the mailing process will pick up the CLIENT version of the Itinerary, if it exists.
To create a Tour level Itinerary
- Click the Tour button to create a Tour level Itinerary
- you will be taken to the preview mode, where you can review, customise, then store the Itinerary, using the carousel view. Learn more about the carousel view below.
- All days will show in a Tour level Itinerary, even when some days are not used by all clients
- When sending emails with an Itinerary attached, the mailing process will pick up the TOUR version of the Itinerary, if it exists.
To customise the Itinerary, using the Carousel view
- If you have selected to Edit the Personalised Itinerary, or if you have selected a Tour level Itinerary, you will be delivered to the pre-Preview layout, where you can modify many elements of the Itinerary.

- ANY element can be hidden from the final itinerary, simply by clicking on the show button, to switch it to hide.

- Text fields can be clicked into directly to edit text to make it more relevant to your client's adventure, or to expand/condense space to improve the look of the document

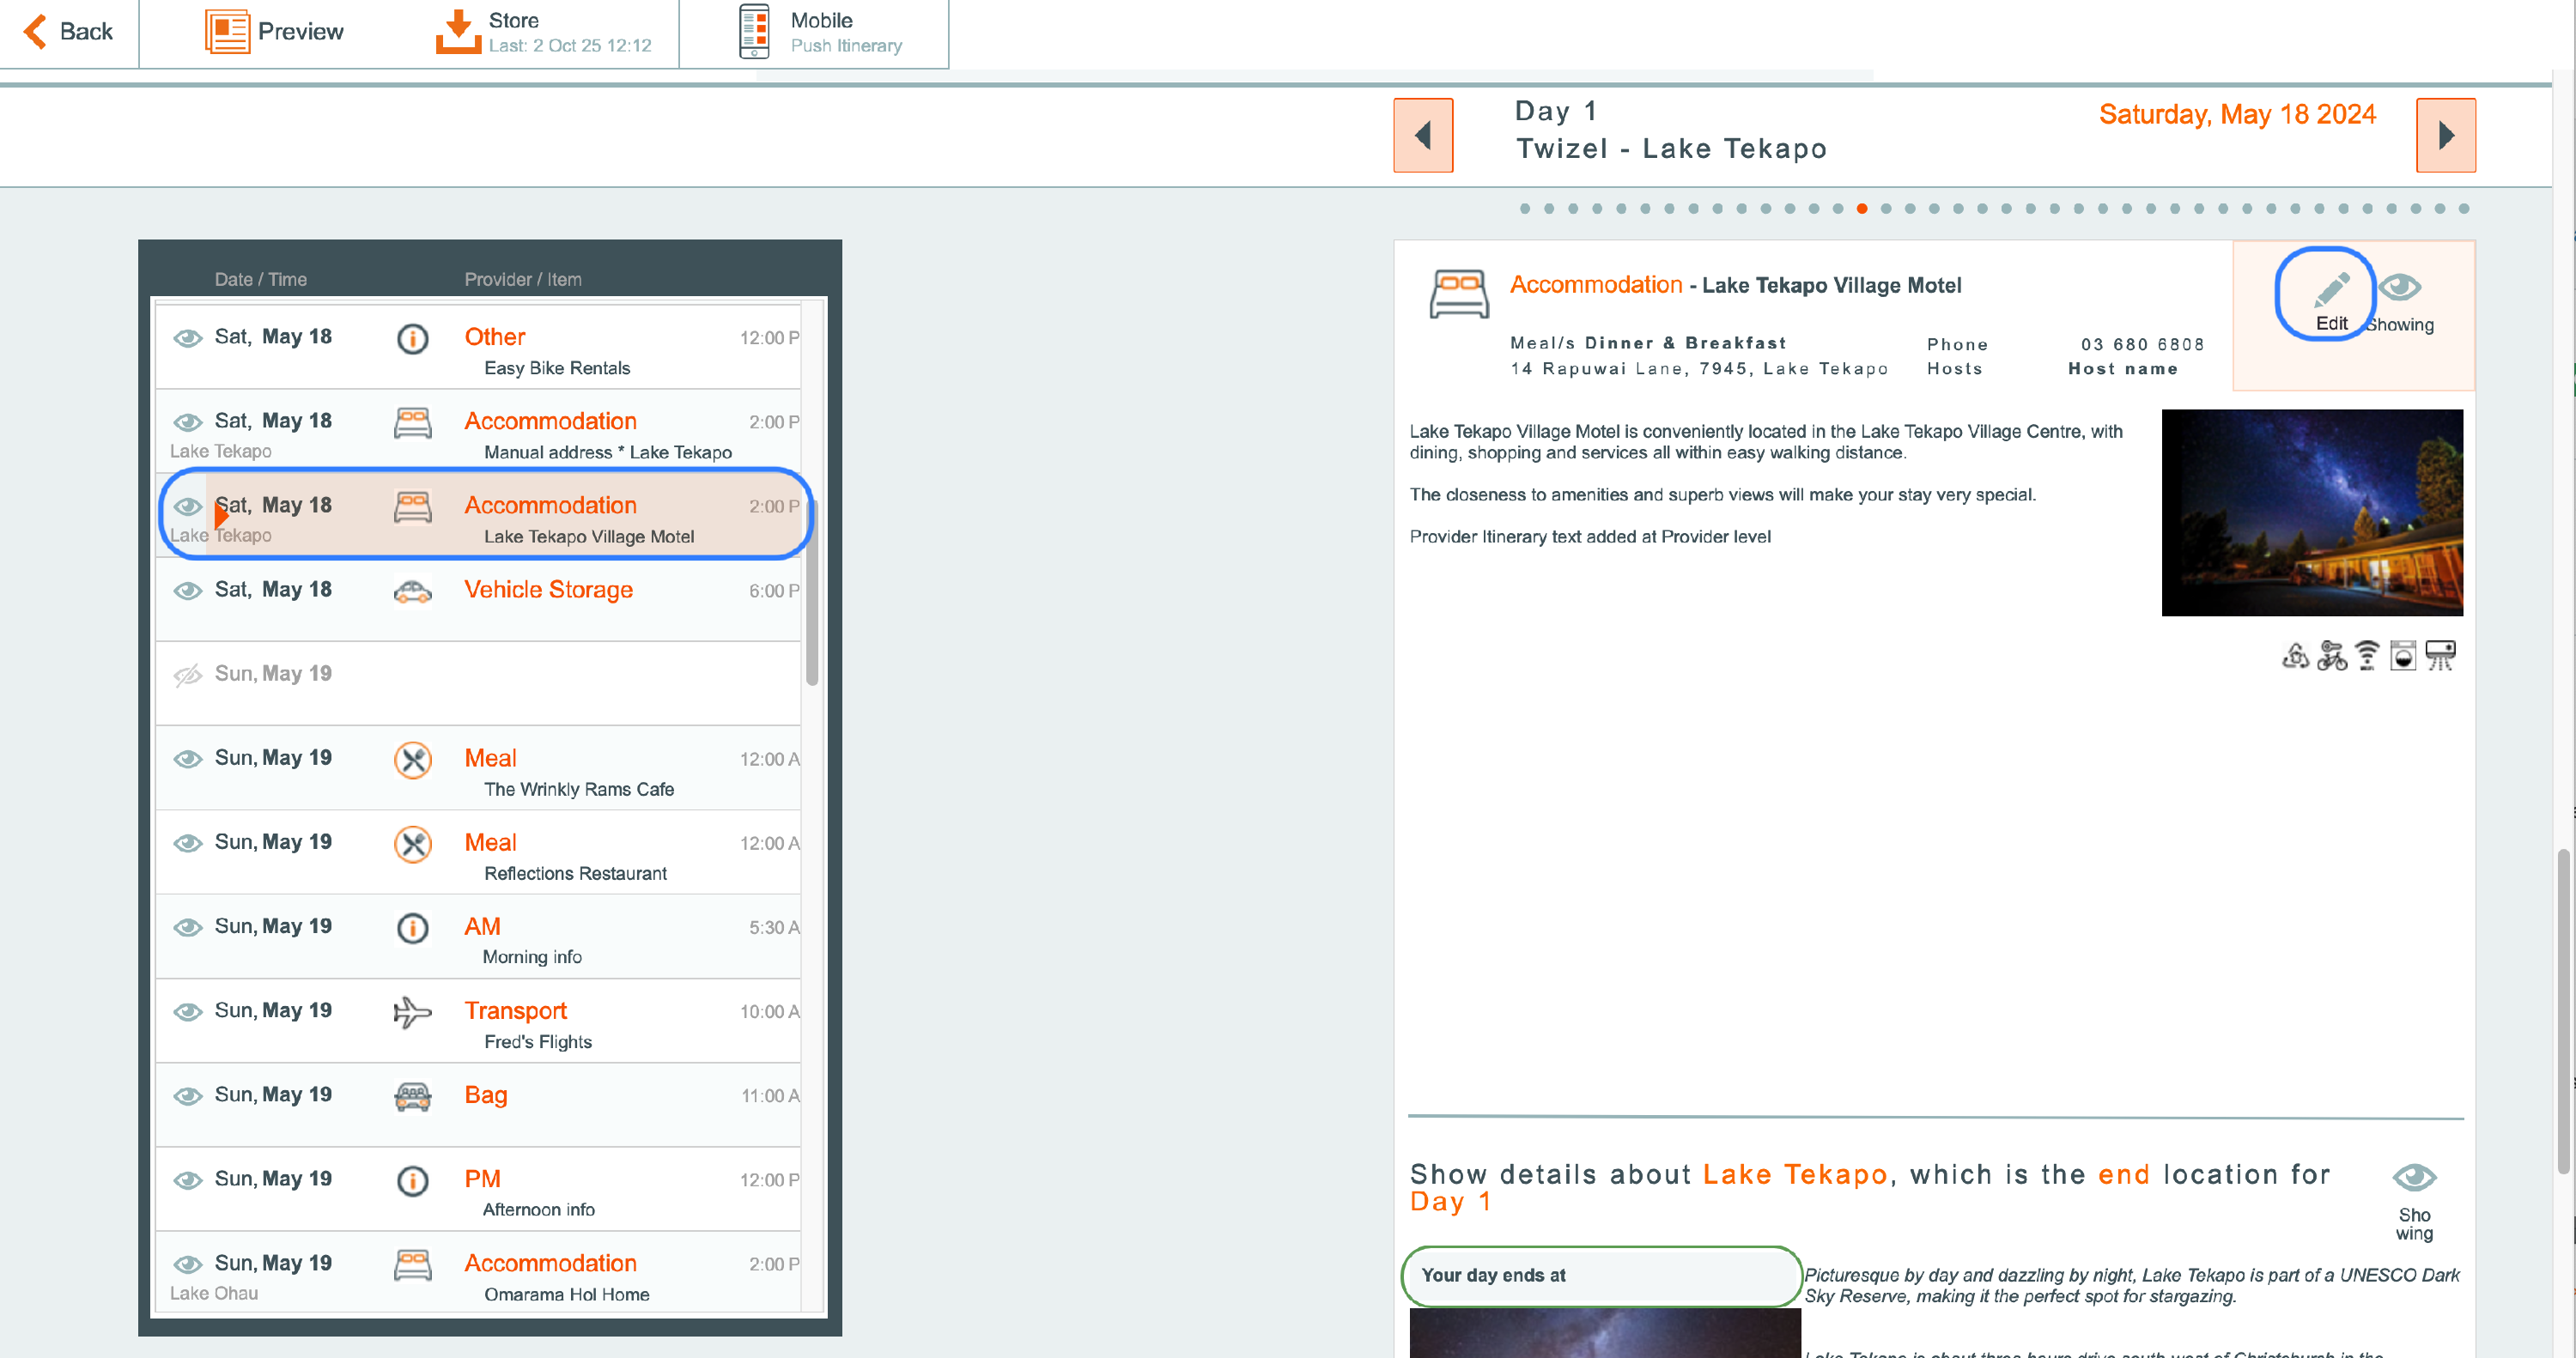
- When you reach the section of the Itinerary where each day's activities are listed, the itinerary becomes a "carousel"

- Navigate to each daily item by clicking on the right or left arrows. Each daily item can be shown or hidden, provider text modified, time changed, notes and labels edited.

- or, for an even faster and very accurate way to navigate to the correct daily entry on the carousel, use the Timeline panel

- the timeline is a scrollable list of each record in the carousel. If an item turned on, it will be listed in orange, if it's turned off, it will be in grey, and the show icon will be struck out. Each night's accommodation will also display the end of day daily location, to help you navigate your way.
- Simply click on any item to jump straight to it!
- The item can then be edited as required
Provider text
Accommodation Provider records can be edited, by clicking once on the required provider on the left hand side of the carousel, and then clicking the Edit (pencil) button the right hand side.
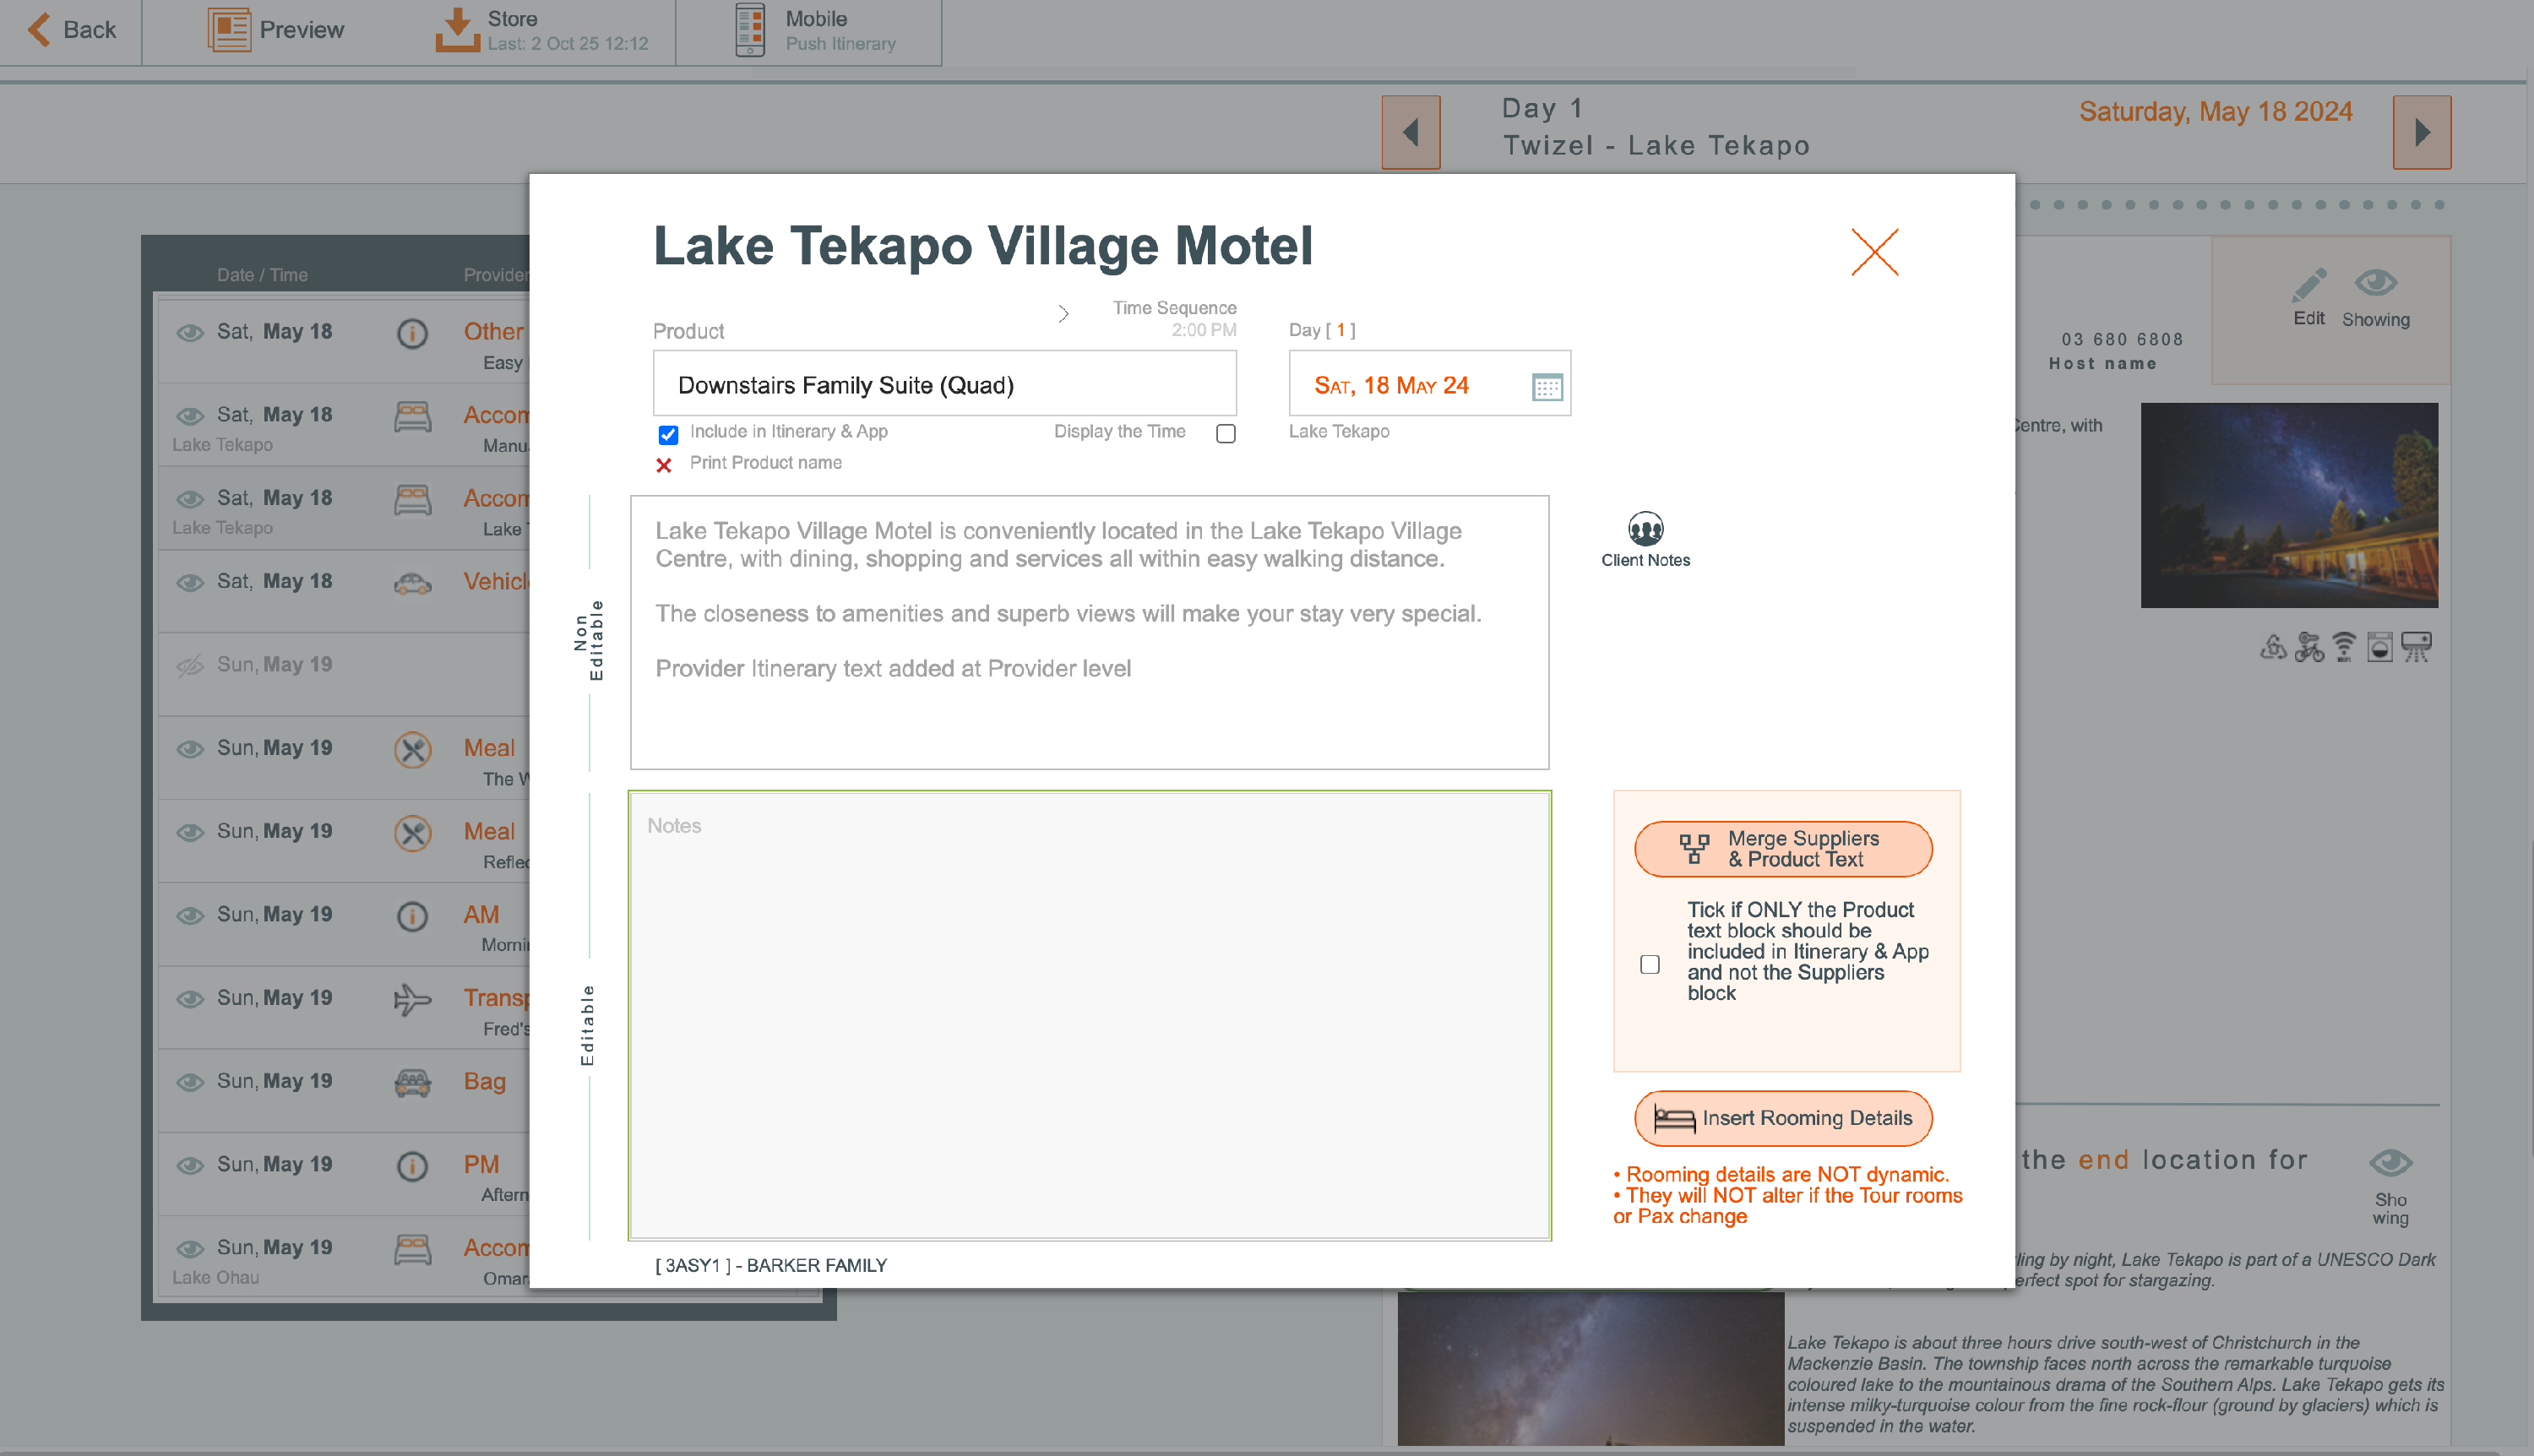
Include in Itinerary & App
- Leave the tick on this tickbox if you wish a record to show for this provider on the Itinerary,
- Remove the tickbox if you do not wish a record to show for this provider on the itinerary.
Print Product Name
- This field is not editable here, but is configured on the Main Provider | Product record. If the name of the Provider Product is not to be shown on the Itinerary, it is defined on the Main Provider | Product record, and that will be reflected here in the carousel view.
Display the Time
- Occasionally you may not want the time to display on the Itinerary, as it might have only been entered to ensure that the correct sequence of events happens throughout the day. If you do not wish the time to show, untick the "Display the Time" tickbox.
Client Notes
- Notes which have been entered on the Tour | Provider |
Provider Text - non editable
- The text that has been entered on each Provider's Itinerary text field will be shown here. This text is not editable.
Product text editable
- The text that has been entered on each Provider PRODUCT Itinerary text field will be shown here. This text is editable.
Merge Suppliers and Product text
- a button is available to make a COPY of the Provider level itinerary text, and merge it with any PRODUCT level text which is entered on this Provider's record, putting this MERGED text into the 'Editable' green box. This means the user can edit Provider level text, for this Itinerary, but it does not impact the text on the ACTUAL Provider record
Tick this box if only the Product text should be included
- Put a tick in the tick box if you do not wish the Provider text to show in the Itinerary, only the Provider PRODUCT text
Insert Rooming Details
- In addition, the Provider PRODUCT text box can have the Rooming Details for this tour inserted in. This text is then editable, so that Guide accommodation, for example, can be edited out. Please note that these Rooming Details are not dynamic, i.e. if the provider records get changed at tour level, the user will need to come back to the inserted text here in the carousel view, and edit it. Note that this Rooming Details text can also be inserted into the Itinerary's Provider product field, at Tour level.
Storing the Itinerary
When you are satisfied with the content of the Itinerary, it is time to store it. Storing the Itinerary means it is able to be emailed to your clients, and also pushed to the Ody Trips app, for Odyssey clients who use this Advanced module.
- From the pre-Preview view, click the Store button
- the Itinerary details will automatically be stored, and a yellow message will appear to advise you that this has been done. The message will automatically close in a couple of seconds.

-
Depending on your company setting, this may also automatically push the Itinerary to the Ody Trips app
- If you need to manually push the Itinerary to the Ody Trips app, click the Mobile button
- a yellow message will appear to advise you that the Itinerary details have been pushed to the Mobile app. The message will automatically close in a couple of seconds.

- back in the Outputs menu, on the Itinerary record
- once the Itinerary has either been stored and automatically pushed to the app, OR manually pushed to the app, the mobile phone icon will be displayed, to indicate that the Itinerary has been pushed to the app
- and the most recent date and time that the Itinerary was stored, are displayed
- along with the number of versions stored

Downloading the Itinerary to your own device
- By clicking on the peach field to the right of the Itinerary record, a pop up window will display the last time the record was saved, along with the ability to download the Itinerary to your own device. By doing this you can send the Itinerary from your own mail app, rather than through Odyssey, bundle it with some other .pdfs, etc.
- Odyssey will prompt you to save the document, using the a document name of "tripcode_Itinerary.pdf".
- You can overwrite this name if you prefer, or click OK
- Your files are now ready for download
- Click the button showing the filename to download the file

- Open the downloads folder on your device to retrieve the file