
Set up the Itinerary
Here's how to find where to set up Itinerary information on Masters, Tours, Company Settings, Resources, and Providers.

- Odyssey can create an Itinerary (or Trip plan) for you, based on various Itinerary Notes fields you have populated in a number of different locations within Odyssey.
- This document lists the various places within Odyssey which could, or should, be populated in order for Odyssey to populate the Itinerary.
- The itinerary is designed so that in many cases, if the information hasn't been populated, the itinerary will not leave a blank space, but will just compress that space and carry on to the next piece of data it needs to find.
- The Itineraries text content and settings are initially set up on
- each individual Master
- as well as at Provider and Provider products
- Movements
- Depots
- Routes
- Shuttles
- When a Departure is created it pulls through the itinerary content from all of those locations. The content can then be added to and modified at Departure level - within the Departure and Booking level, and also in the Itinerary creation carousel. Learn more about creating and editing the Itinerary, as well as using the carousel Here
- It is important to note that not every item you see here on our sample itinerary has to be included in your client's itinerary, items can be set to "not show" at individual departure level, and also on the individual itinerary. The text, and field labels can be edited in the itinerary itself too!
To learn how to PRODUCE the Itinerary, click Here
How to use this page:
- On the image of the Itinerary above, find the Itinerary entry you wish to find out how to populate in Odyssey, e.g. Morning or Afternoon text, G1 and G2
- Scroll down this page till you find the G section, locate G1 and G2 - OR - alternatively, use the table of contents below to go directly to G
- Follow the instructions on how/where to enter your own text into Odyssey
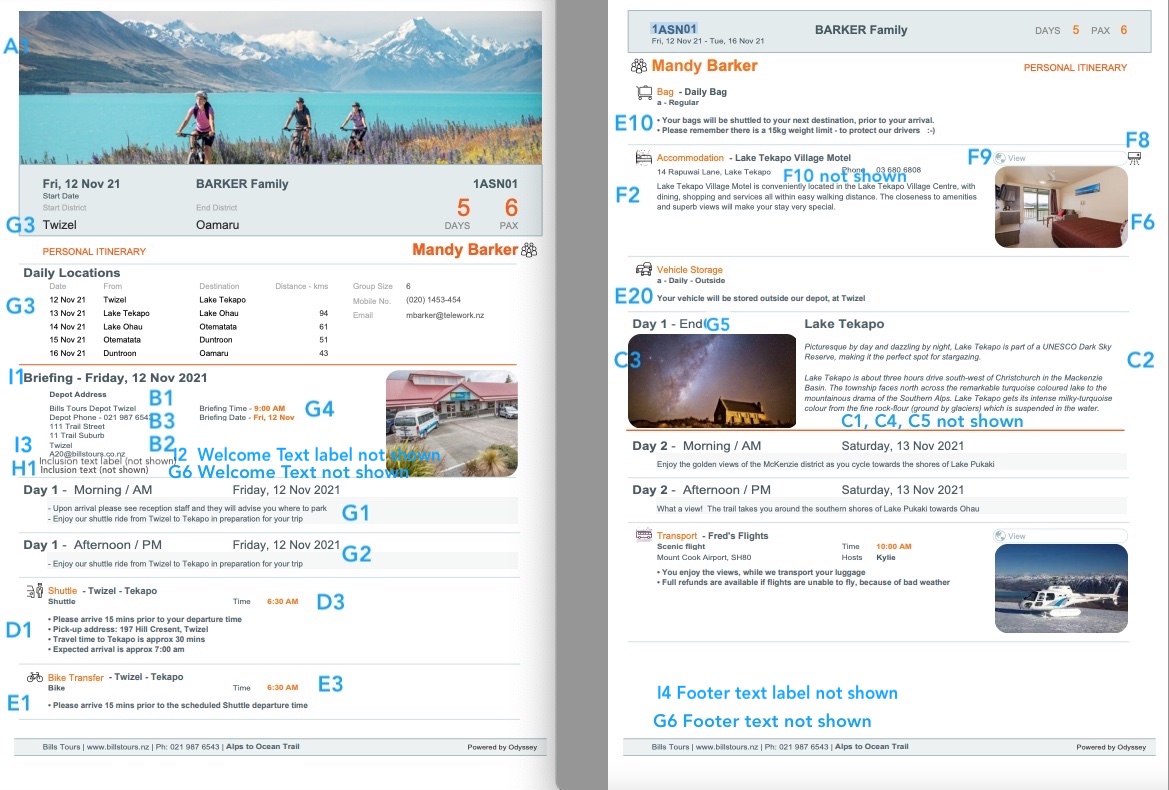
- A - Banner Heading
- B - Depot Info
- C - Districts
- D - Route/Shuttles
- E - Movements
- F - Providers
- G - Masters
A Banner heading / branding / top image

- (A1) These Itinerary banner headings are drawn from Banner images saved on each Trail
- From the Main Menu | Administration | Settings | Company Settings | Trails
- select a trail, click Branding,
- Click choose in the "Itinerary Banner image" area, and select an image to use as your banner heading. (Dimensions = 28.0 cm x 8.0 cm / 787 pts x 230 pts )
- The Day/Date headings, and times colours on each client's Itinerary also come from the Branding settings for each Level 1 (Country/Trail/Activity).
- As well as your main Trails, alternative briefing locations can be defined. Learn more about Trails and Briefing locations here. Note that these alternative briefing locations cannot be defined at Master Level, as they are designed for selection on specific Tours only.
- Note that an Agent's Itinerary doesn't have to use these L1 banners.
B Depot Info
- Information relevant to the start location of the Departure (i.e. the Depot) will be gathered from these fields
- From the Main Menu | Administration | Settings | Company Settings 2 | Trails (L1)
- select a trail, click Depot
- (B1) Depot Name, (B2) Address, (B3) Depot Phone,
- (B4) Depot Image (Dimensions = width x )
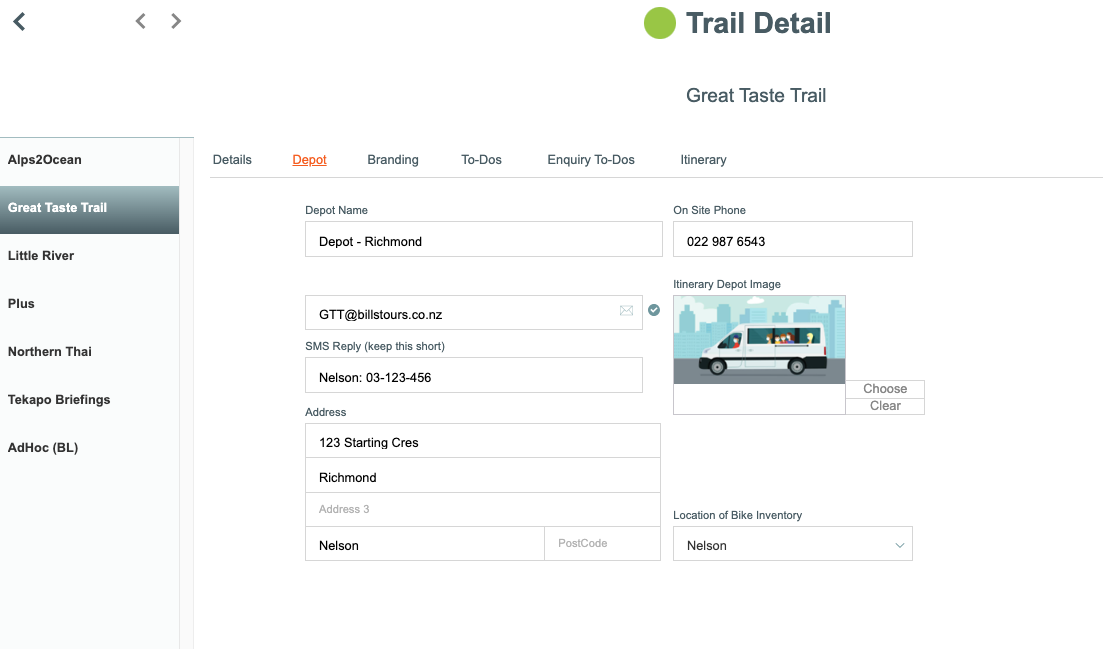
- Note: ANY DAY prior to Day1 will NOT display the lefthand text block that says 'Day-1-End'
C Location
- The locations used on the Itinerary are the various places the clients will visit on their journey.
- From the Main Menu | Settings | Company Settings | Locations
- Select a Location
- Itinerary + App and PDF tab:
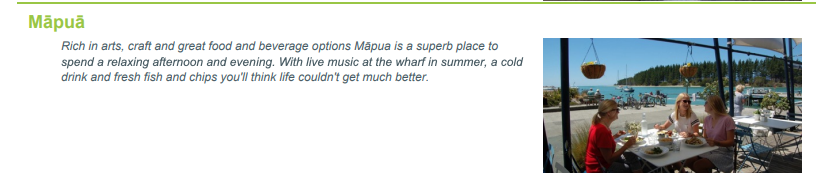
- (C2) Content - this area is for general itinerary information, e.g. "Rich in arts, craft and great food and beverage options Māpua is a superb place to spend a relaxing afternoon and evening. With live music at the wharf in summer, a cold drink and fresh fish and chips you'll think life couldn't get much better." We have an AI tool to help you with this!
- (C3) Itinerary Image - Upload an image which beautifully reflects this location
- (C1) (C4) & (C5) No longer used
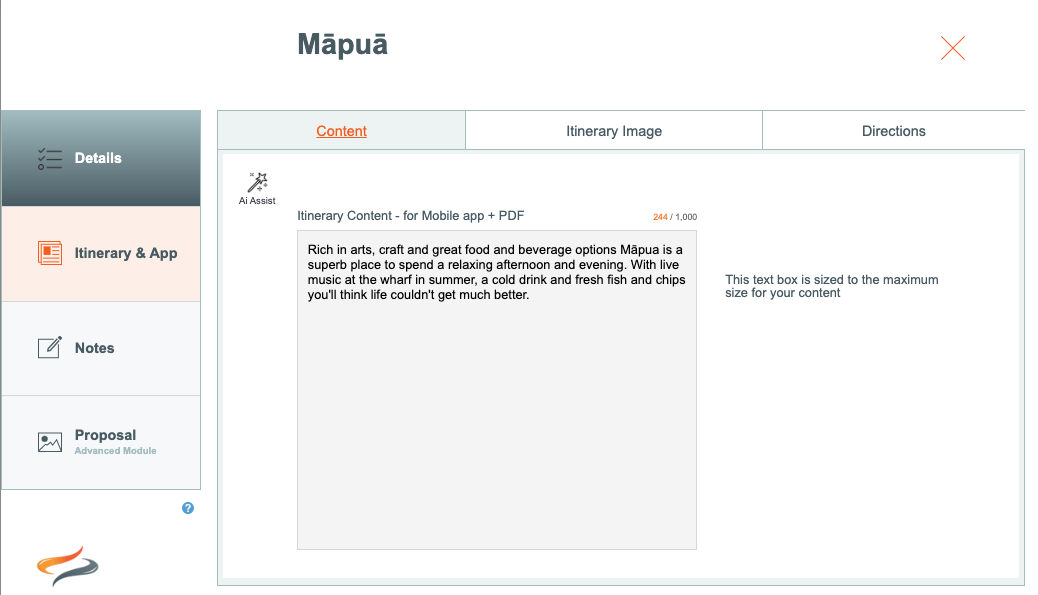
- Learn more about Locations Here
D Route/Shuttle information
Tip: Where data has already been entered into an Odyssey field, you will see a pencil mark beside that field
- Text: Main Menu | Resources | Routes | Timetable | Sector | Notes tab | Notes - Itinerary
- For every product (sector) inside each shuttle run:
- From the Main Menu | Resources | Routes | Route Timetables and Rates
- Select a Trail, and then repeat for each trail
- Select a route
- Click on the Timetable tab
- Click on each route Sector, and click on the Notes | Web tab
- (D1) Notes - Itinerary - Enter a block of text to appear on the Itinerary for this sector, e.g. This could say "9:00am approximate arrival time in Tekapo"
- (D2) URL - Website - This could be a link to the shuttle timetable from your website
-
(D2) URL - Photo - Optional.

Setting up Route Info for the Itinerary 
Point your clients to a web page showing route or transport info, the Itinerary 
Include an image of the Route in your Itinerary (D3) Time: Main Menu Resources | Routes | Timetable | Sector
Learn more about Routes Here
E Movements
-
Movements are specific to trails, so these steps need to be taken for each Trail
If you never want a particular movement to show on an itinerary, a movement type can be turned off for the Itinerary from the Main Menu | Resources | Movements | Movements and Rates | Product tab
Bike Movements
For each Bike Movement type:
From the Main Menu | Resources | Movements | Movements and Rates, select a movement type, e.g. Return to base:
On the Details page, we offer you the ability to define whether this item is included or excluded from the Itinerary. Tick the tick box if you wish it to be included

Choose whether or not to include Movement info on the Itinerary, on the Movement product On the Notes tab,
- (E1) Notes - Itinerary - enter any text you wish to appear on the Itinerary in relation to this bike movement.
- (E2) URL - Website - This could be a link to the shuttle timetable from your website
- (E3) Enter the time for this bike movement For each Bag Movement type:From the Main Menu | Movements | Movements and Rates, select a bag type, e.g. Bag storage, or regular:On the Details page, we offer you the ability to include or exclude this item from the Itinerary, tick the tick box if you wish it to be included(E12) Enter the time for this bag movement On the Notes tab,
- (E10) Notes - Itinerary - enter any text you wish to appear on the Itinerary in relation to this bag movement.
-
(E11) URL - Website - This could be a link to the shuttle timetable from your website

The Bag Movement product tab allows you to enter text for inclusion in the Itinerary, as well as a link to a useful webpage (E12) On this same tab you are also able to enter Website
Vehicle Storage
- From the Main Menu | Resources | Movements | Movements & Rates | Select a trail, and repeat for each trail
-
Select Vehicle Storage
On the Details page, we offer you the ability to include or exclude this item from the Itinerary, tick the tick box if you wish it to be included
- On the Notes tab,
- (E20) Notes - Itinerary - enter any text you wish to appear on the Itinerary in relation to this bag movement.
- (E21) URL - Website - This could be a link to the shuttle timetable from your website
Vehicle relocations
- From the Main Menu | Resources | Movements | Movements & Rates | Select a trail, and repeat for each trail
- Select Vehicle Relocations
-
Click on a Product Description line eg Twizel to Omarama
On the Details page, we offer you the ability to include or exclude this item from the Itinerary, tick the tick box if you wish it to be included

Choose whether or not to include Vehicle Movement info on the Itinerary, on the Vehicle Movement product - On the Notes tab
- (E30) Notes - Itinerary - Enter a block of text to appear on the Itinerary for this movement, e.g. "Your vehicle will be relocated and left in our secure depot facility"
-
(E31) URL - Website - Optional

The Vehicle Movement product tab allows you to enter text for inclusion in the Itinerary, as well as a link to a useful webpage
-
We offer the ability to turn off individual Route & Movement Products - so you can keep ’some’, and it can be different per trail
And also the ability to select which Provider - Product Descriptions will print. - this is for all trails - Providers ‘usually’ only operate on 1

Learn more about Movement types Here
F Providers
Tip 1: We suggest you work on your ' favourites' first. (Assuming you have marked some providers as favourites!) To find all of your favourites, Select the Provider type from the drop down list, e.g. Accommodation, sort the list by favourites, then click the View all button
Tip 2: This is also a good time to ensure that all Providers have accurate address information. Then you can click the GET button, to provide latitude and longitude co-ordinates for this provider. If and when your client eventually uses an electronic version of the itinerary, if the client gets lost they can use these map co-ordinates to navigate back to the correct location.
Tip 3: Some of these fields below are marked with an *. These fields are initially populated in the places shown below, but can be manually changed by the Reservations staff when making a booking
Tip 4: This needs to be done for all Provider types: Accommodation, Transport, Meals, Other.
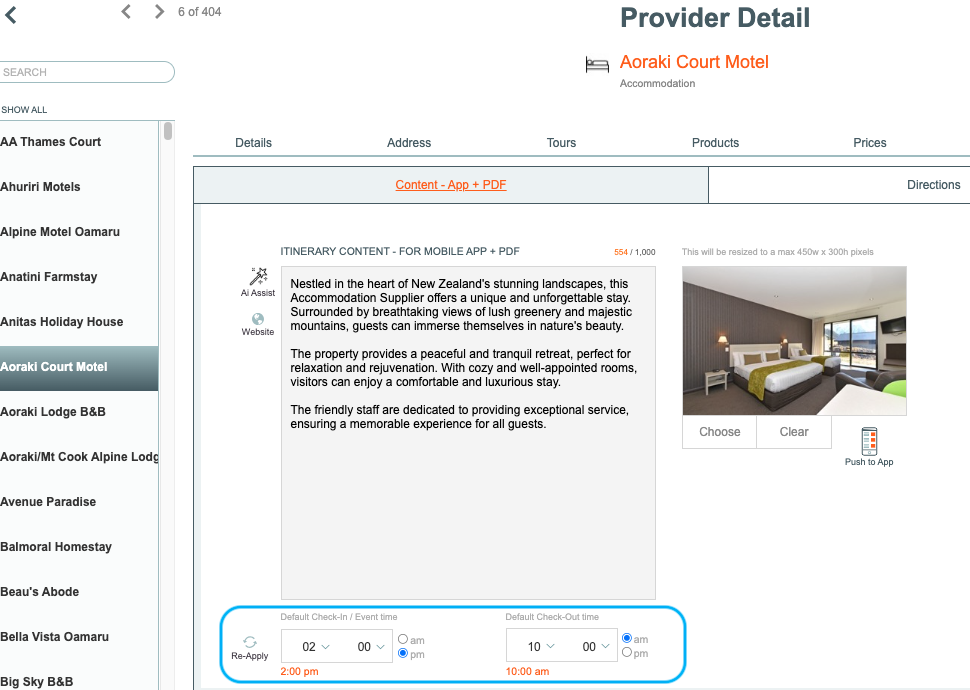
- From the Main Menu | Providers | List
- Select a Provider from the list, and
- Go to the Movements | Notes tab
- (F1) MOVEMENT INFO: If required, enter the Distance to trail field, in kms. (This field is not currently used anywhere in Odyssey, but we have may have populated this for you from your previous database, and didn't want you to lose it!)
- From the Provider | Itinerary tab
- (F2) Content - App + PDF | Enter a block of text to appear on the Itinerary for this Provider, e.g. This could say "Nestled in the heart of New Zealand's stunning landscapes, this Accommodation Supplier offers a unique and unforgettable stay. Surrounded by breathtaking views of lush greenery and majestic mountains, guests can immerse themselves in nature's beauty." We have an AI tool to help you compile this text
- When creating the Itinerary, the text is built from the
- Provider itinerary text first,
- then ADDS any PRODUCT info (which will display in bold).
- Next is the Trip level text,
- then ADDS any Client Booking text. (which only displays IF the Itinerary is created for an individual client) - where specific 'Client' info needs to be printed on a Departure level crested itinerary... then the text should be added in on the Departure level text box.(Eg: Bob & Mary have the ensuite units, Max & Kim are in the upstairs studio)
- (F3) Directions - e.g. "Down a long drive, past the third red letterbox"
-
Learn more about setting up Provider Itinerary text here
- Go to the Provider Products tab, select a Product, select the Itinerary Info tab
- (F4) Itinerary text - Enter a block of text to appear on the Itinerary for this product, e.g. This could say "Each hot tub..."
- (F5) URL - Website - This could be a URL link to the Provider's product
- (F6) Picture/Photo - Optional. This could be a URL link to a photo
- Learn more about Provider Products here
- (F7)* Provider checkin times are stored in Provider | Itinerary | Content - App & PDF
-
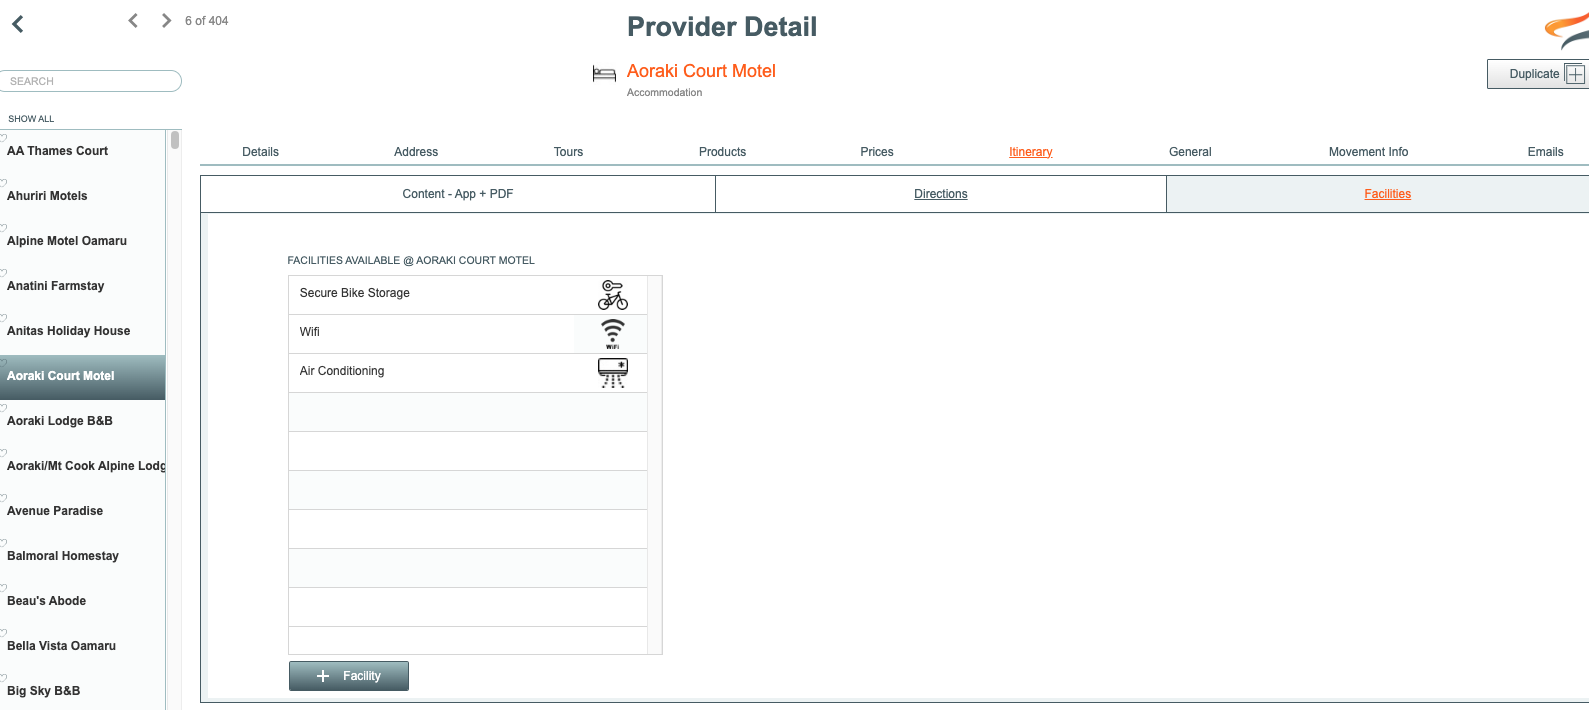
(F8) Provider facilities such as WiFi, or secure bike storage, are stored in Provider | Itinerary | Facilities. Up to 5 facility icons can be displayed on the Itinerary.
- (F9) The Provider's website can be viewed from here, using the Itinerary and the Mobile App. From the Provider | Address field, populate the Provider | Details | website URL field
- Learn more about Provider | Movements Here
-
(F10) Booking Level Provider Note for Itinerary text
Any text entered at Booking Level on the Provider Notes Itinerary field will display in Italics, above the standard Provider/Product text that cannot be edited from within the Itinerary. If Provider/Product text needs to be edited, it has to be done on the Provider/Product- which you can only do if you have appropriate Odyssey access security.
- Usability suggestion: We recommend the use of a RETURN character AFTER any entered text. This creates a better readability experience for the user, and adds clarity to the 'italic' nature of the inserted comment/note text. Odyssey will not enforce or suggest this, as the user should have the controls, so that the output does not get 'bloated' and overly long.Your clients can click on the view button to view the website of the accommodation provider.
Summary: Provider Itinerary notes can be recorded on:
The Provider record (on the Itinerary | Content - App & PDF Text field)
The Provider product record (on the Notes for Itinerary tab) if there is something special you want to say about this product; e.g. This glorious King Luxury suite overlooks Mt Cook ….
The Master Provider record (on the Notes for Itinerary tab)
These notes are gathered up and shown on the the Departure Provider record (on the Notes for Itinerary tab) where you can add text if there is something you wish to add specifically for this group, or delete some content. This content can also ALL be switched off here so that it doesn’t print on the itinerary
Additional Provider notes can also be added on the Booking level Provider record. This text will appear in italics in the Itinerary above the standard Provider/Product text that cannot be edited from within the Itinerary.
AND remember, that this content can also be edited and shown/hidden on the Itinerary carousel
G Masters (and subsequent Departures)
Each Master (Package) that you offer, has a list of Daily Locations, and each daily location can have information stored on it which populates the itinerary. Departures that have been based on these masters will also contain all of this information, and it can then be customised at Departure and Booking level too.
- From the Main Menu | Masters | List, select a trail, and select a Master
- Click the Daily tab
- Click the Itinerary tab
(G1) one field for the am text
e.g. "Once you head off on the bikes today, there are no shops or services until cycling back to Twizel. We suggest you take with you enough food and water for the whole 55km distance.
54km cycle from Tekapo to Twizel
Your bag/s will have been transferred from Tekapo to your accommodation."
(G2) and another field for the pm text
Tip: These fields can be refined/customised at Departure/Trip level by the Reservations staff, if required
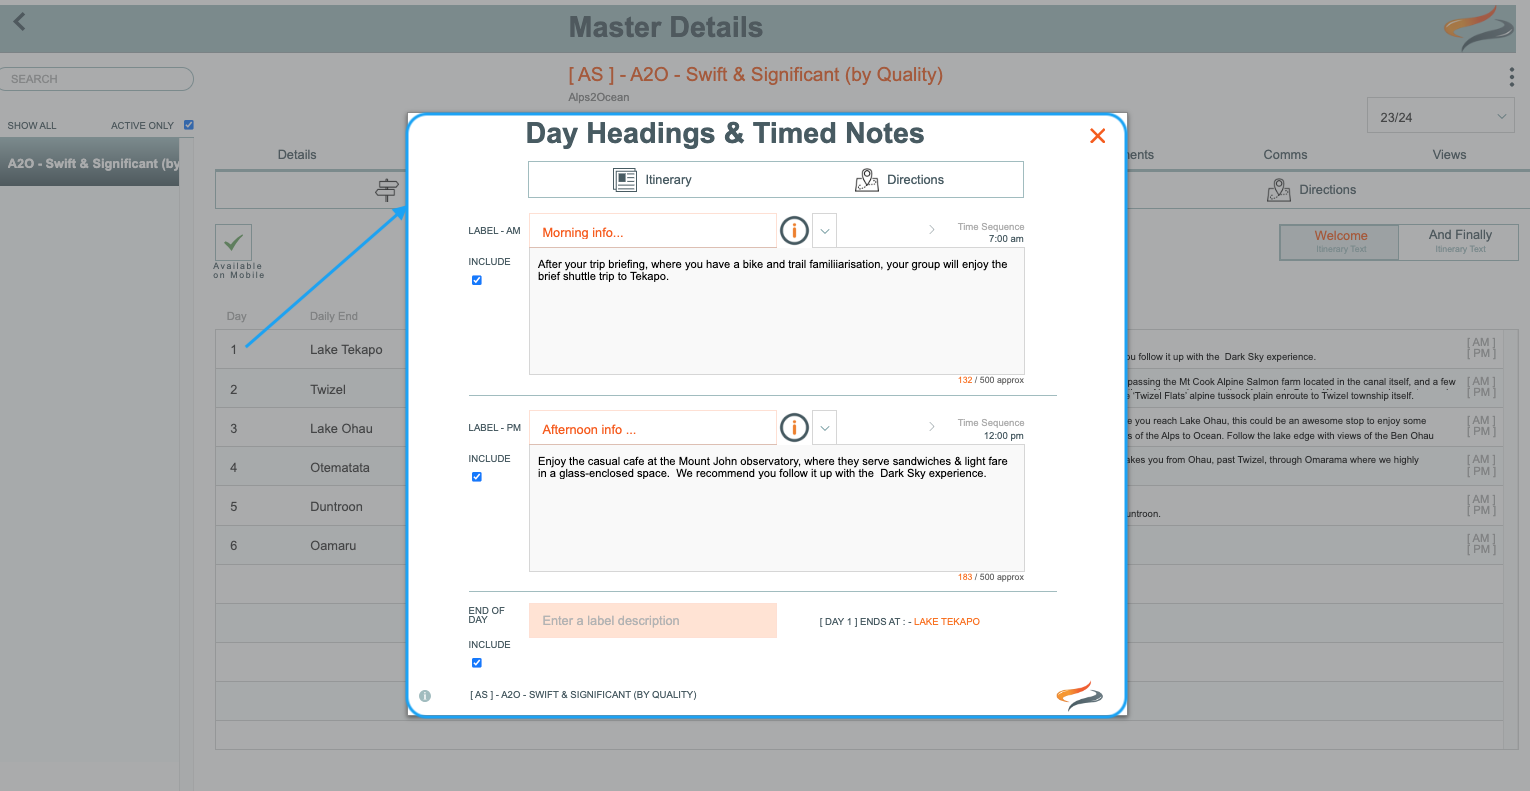
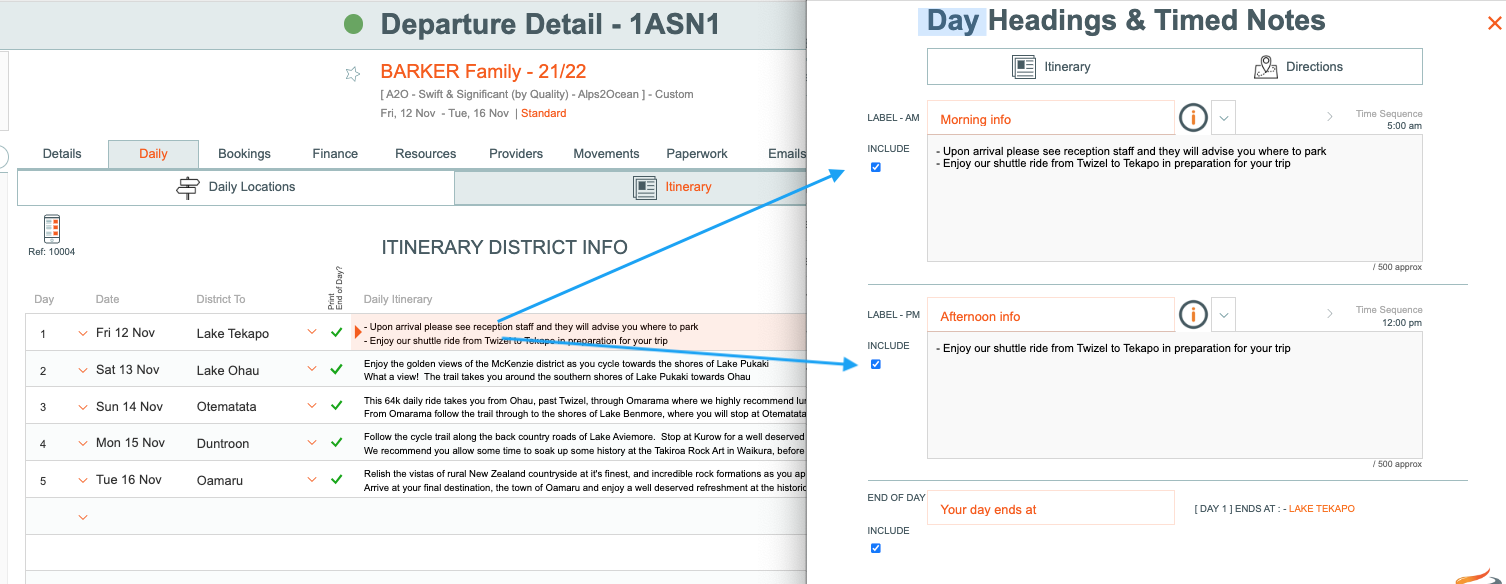
(G5) AM - PM - End of Day Headings/Labels
-
The headings/labels - Morning info, and Afternoon info and end of day locations - and the timing of these, which affects their placement in the order of events, can be entered here in the Master Daily | Itinerary | click on a day | Label am and Label pm fields, and also customised in the Departure | Daily | Itinerary | click on a day | Itinerary Text daily settings
Once a departure has been made these labels and timings can also be edited in the carousel.
The "End of day label" can be used if, for example, it's the end of your client's cycling holiday, but they may still have further elements, such as a shuttle, or if their accommodation is in a different location. So, Day 5 could say "Your cycling day ends at"
-
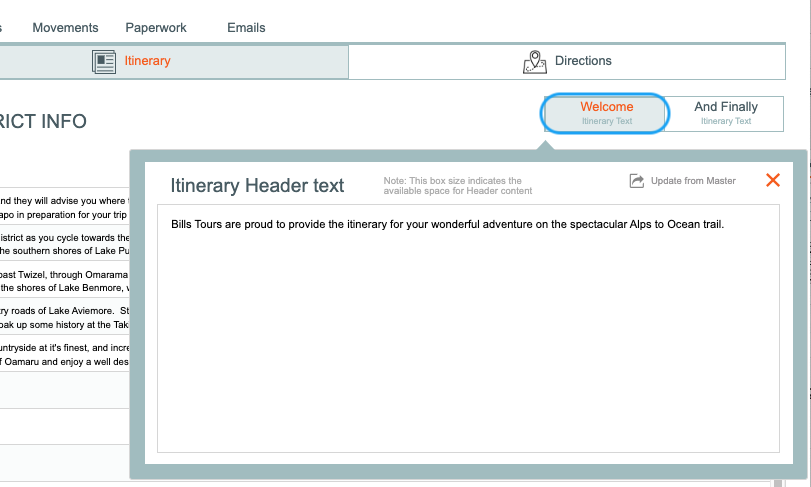
(G6) Welcome and Footer text
- This text comes from the Master (and subsequent Departures) | Daily | Itinerary | field, This optional text field could be used to provide a warm welcoming message, describe some trip highlights, describe food options along the way, etc.
- and they can also be modified at Departure level and when looking at the Itinerary's carousel
- (G3) Daily Locations
- From the Main Menu | Masters | List, select a trail, and select a Master
- Click the Daily tab, click on Daily Locations
- They can also be modified at Departure level
-

(G4) Briefing Time
- From the Main Menu | Masters (select a Master) | Details tab,
-
From the Details tab, select the standard briefing time for this Master


The briefing date and time can be adjusted at Departure level on the Departure | Daily | Depot tab
Learn more about Masters | Daily locations Here
H1: Inclusion text
Inclusion text comes from the Master | Details | Inclusion tab , and then on any subsequent Departures made using this master. Learn more about Master inclusion text Here
I: Labels for Briefing, Welcome text, Inclusions, And Finally text
From the Main Menu | Admin | Settings | Company Settings 1 - General, it is possible to change these field labels:
Labels for Briefing text (I1), Welcome text (I2), Inclusions text (I3), (all at the top of the Itinerary) And Finally (I4) text (the closing text at the bottom of the Itinerary)
Learn more here
Time Settings
Time settings are modified at:
- the main Product settings of the Provider’s Product,
- Movement Product
- or Route Sector
- daily Itinerary text