
Create and Manage Providers
To jump quickly to any section within this document, click on one of the links below:
To create a new Provider
-
Go to Providers | List from the Main Menu
To learn more about the Providers List, click here
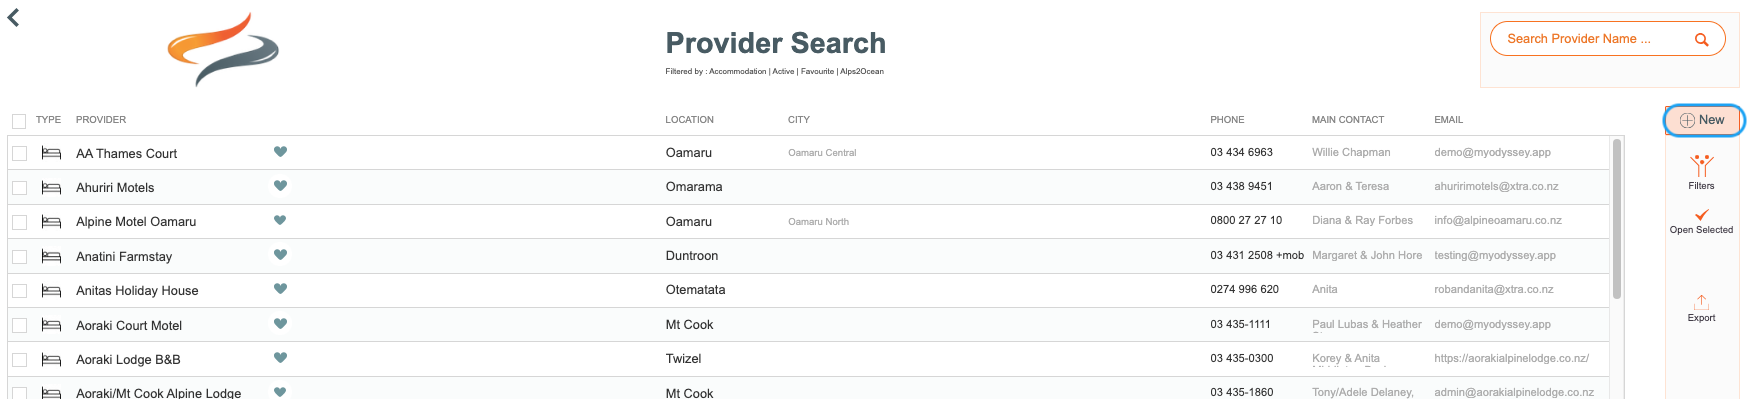
- Click the New Button
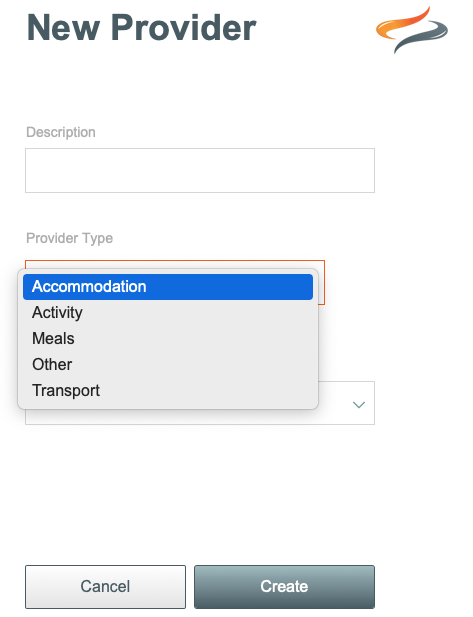
- Enter the Description (Name) of your new Provider
- Select the Provider Type from the drop down list. To learn more about provider types, click Here
- Click Create
Details
To manage a Provider, click on the Provider name in the Provider list.
Tick the box beside favourite if this Provider is a well used and enjoyed provider. (This doesn't treat the provider any differently within Odyssey, it is just a 'tag' for your reference. The Provider list can be sorted by favourites, to make them easier to find.)
Type an email address for this Provider, and ensure it gets the tick that it is a valid email address
Type in the Provider's phone number
From the Type drop down list, change the Provider type if it wasn't entered correctly in the previous stage. The type of providers you have in this drop down list is determined by your Provider Type settings Here
Type the name of the Main Contact, along with the Owner's names.
The Status button can be switched between Active and Inactive, to indicate if this is a provider who is still currently used
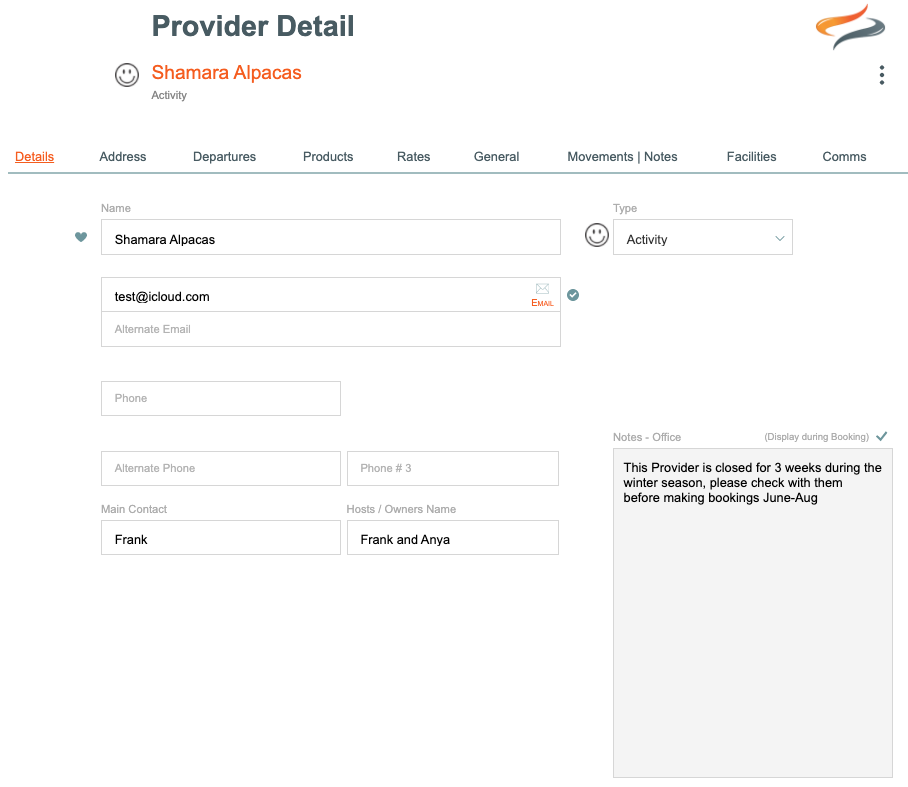
Notes - Office
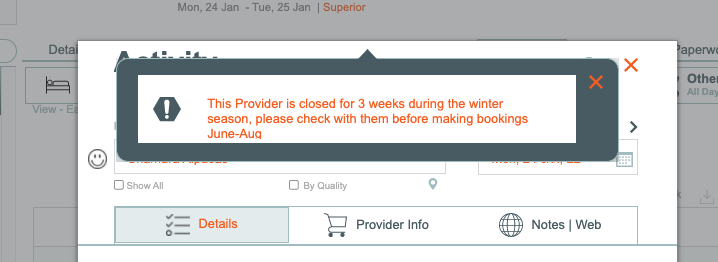
The Office Notes Screen on a Provider record can provide you with a quick way to see if there's something IMPORTANT that need to be identified about this Provider when making a Departure - for example, if a business is closed on some days of the week, or doesn't operate during a particular period, or is closed for renovations.
If you put a tick on "Display during Booking", then when selecting this provider at Departure or Booking level, a pop up note will appear for three seconds, advising the Reservations staff of the text in this note.
If you don't include the tick on "Display during Booking", then this field simply serves as an Office note, regarding this Provider.
Address

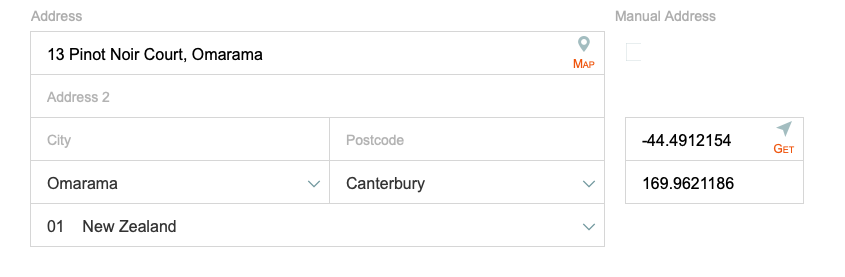
- Enter address and phone number for the Provider
- It's important to include the town on Address Line 2, as that gets printed on the itinerary
- and always populate the Location field, as that ensures that this provider will be available on drop down lists for this district
- Enter the URL of their website. Clicking the Web button will take you directly to the provider website, in a separate tab in your browser.
- Enter the URL you wish to use to check booking availability, along with the username and password for 'agent' access, if this is required. Learn more about this Here
- From the Drop down list, select a District. The District field populates the drop down menus for what providers are available at that location when making a Departure or Booking. (It is essential to complete the district, in order for this provider to be "found" in the drop down lists when creating Masters, Departure, and Bookings)
- Clicking on the Map button will take you to that location in Google Maps

Latitude and Longitude coordinates can be obtained by pressing the GET button. Having these coordinates helps with providing distances between locations.
Specify which Trails this Provider is available on, by putting a tick on the trail. The Apply All button can be used to then apply those trail selections to all the providers you currently have selected.
Tick the manual address button if this address is to be used for Bag Transfers

Departures/Tours
A list of all departures booked with this Provider can be viewed in the Departures tab.
- The number of clients booked with this provide is displayed beside the Departure name

- The status of the booking with the provider can be changed by selecting a status from the drop down menu
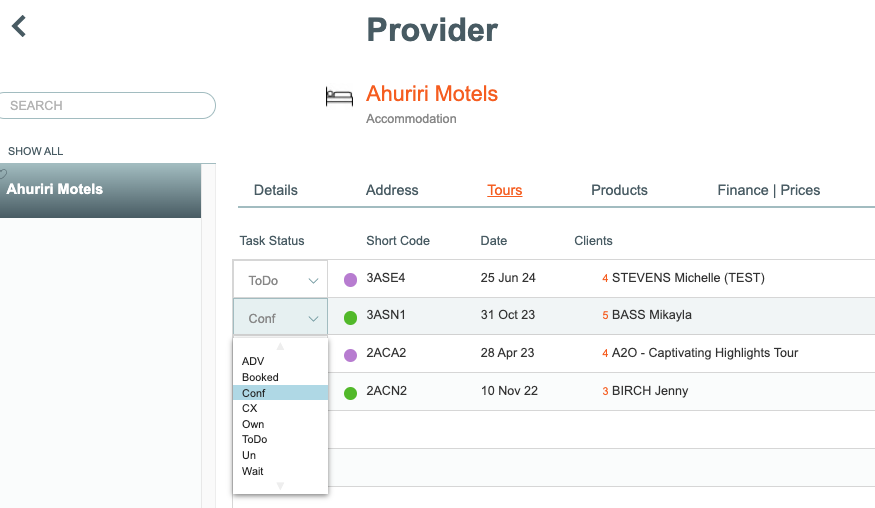
- Click once on a Provider record to view the Bookings made on this tour:
Provider | Tour | Bookings | Client Selections
The bookings on this tour, along with their selected products, rates and pax per room can be viewed here

Provider | Tour | Bookings | Client Selections
- Room sharing info can be viewed here

Provider | Tour | Bookings | Client Selections
- Room Summary info can be viewed here. These lists form the content used in the mergetags written underneath each section, for inclusion in email content.

Provider | Tour | Details/Defaults
- The Details of this Provider's record on the tour are offered here.

- Some Odyssey clients and /or users, have the ability/authority to change a Provider name from here. Discuss with us how we can allow you to do this. By clicking on the Change button you are able to switch to a different provider, if this provider cannot accommodate your clients.

Tour level Provider info screen.
- From here you can add the Provider Reference, Door access code, Payment type, and add an alert if one is required.

Provider Info | Online Form comments
- Online form comments in relation to this tour, submitted by the Provider using the Cognito Forms Advanced module, can be viewed here

Provider Info | Payments
- Payment Info can be viewed and edited here

Products
To learn more about Provider Products, click Here
Rates
To learn more about Provider Rates, click Here
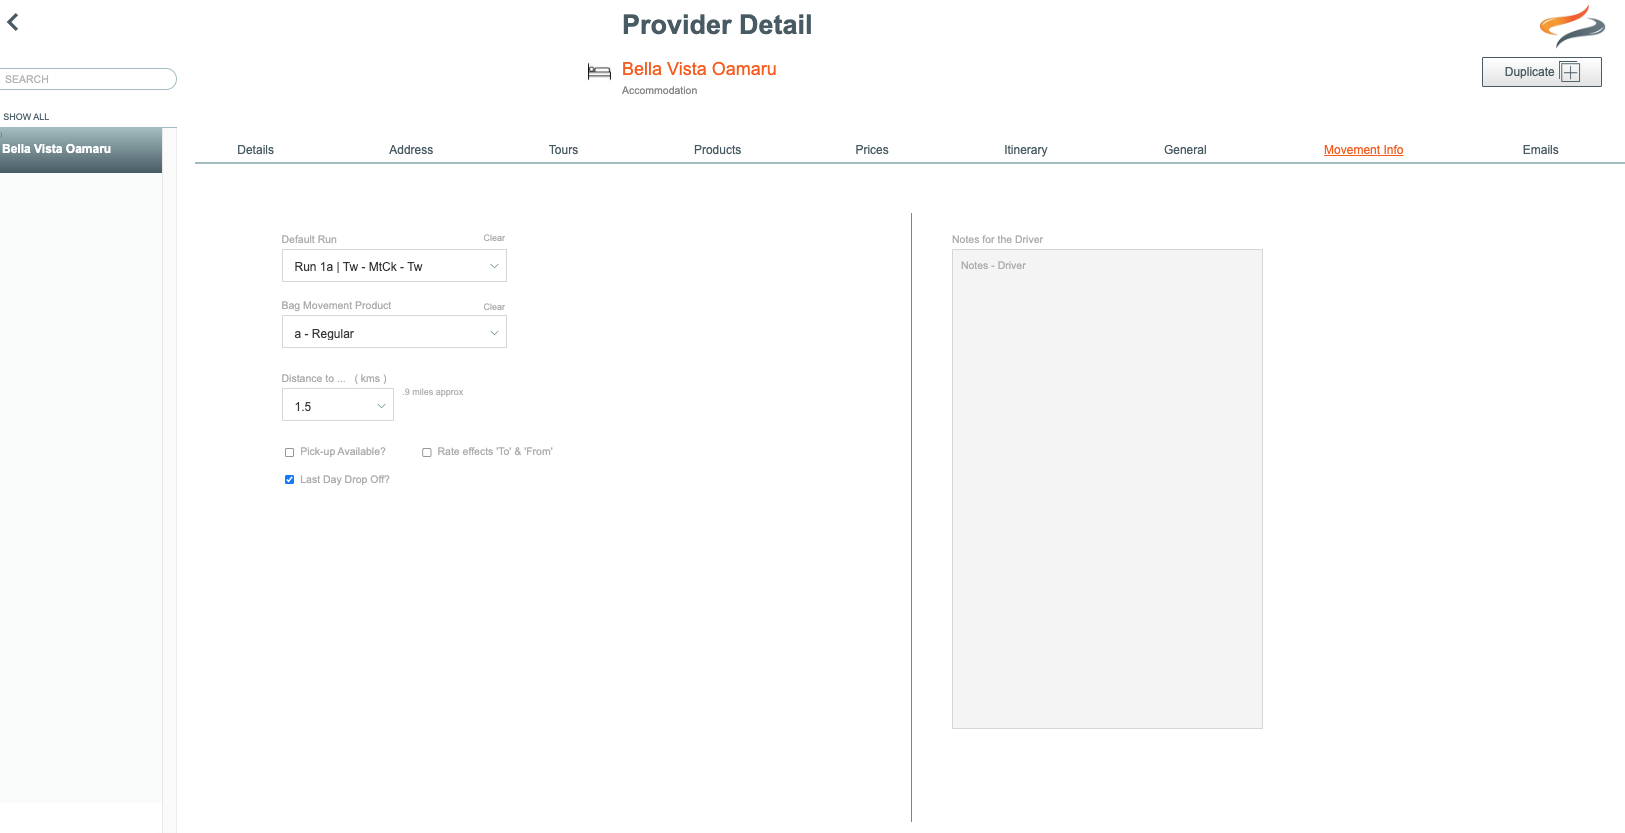
Movement Info
Movements
Select a bag movement route and product from the drop down list. This determines the rate for any bag movements to this provider. If that rate affects movements TO and FROM the provider, then tick that box also. This rate can be changed at Tour level if required.
If this Provider provides a Last Day drop off service, tick that box. Doing this will give you a shortened list of providers, when looking for a last day drop off provider.
Tick the Pickup available field if this provider offers a pickup service
If this Provider is going to Provide custom shuttle/transport services to you, ensure the tick boxes for Move Clients and or bike, or Move bags, are ticked. This way the provider will appear in the custom shuttle's provider drop down list/
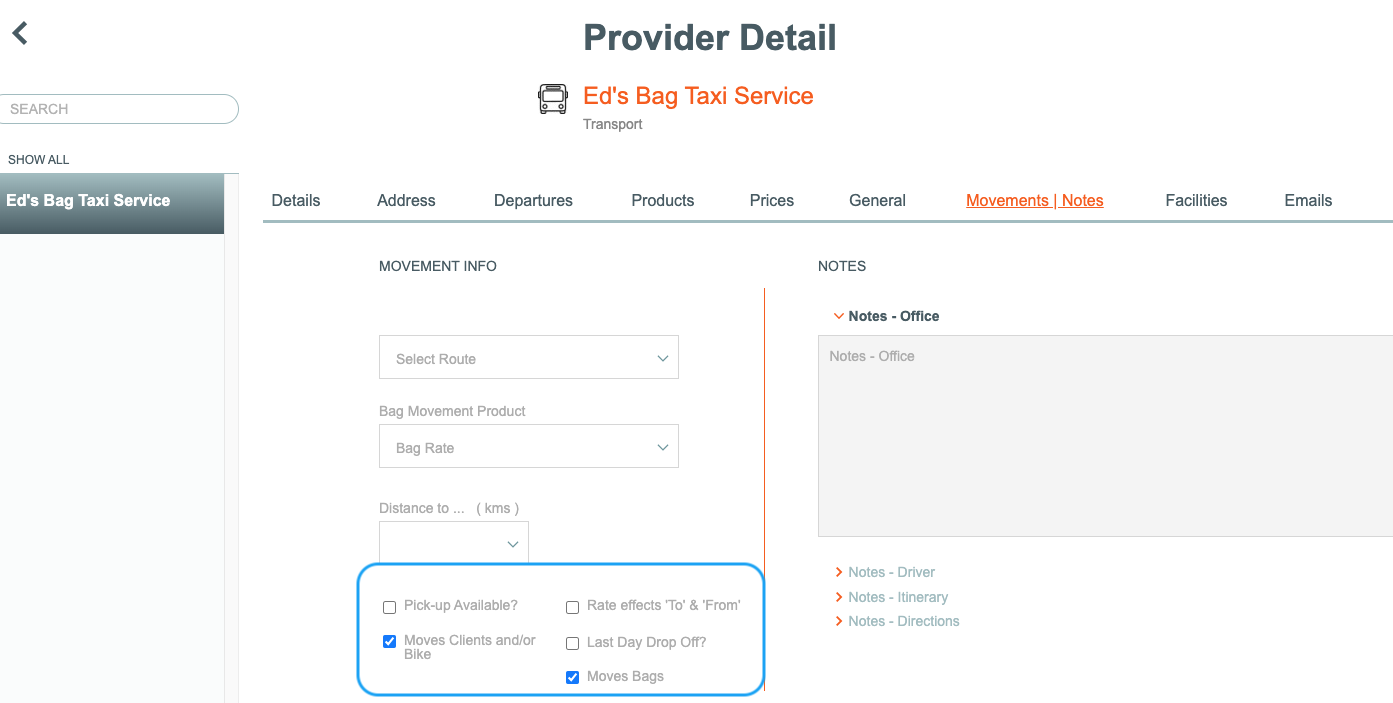
Notes
The notes area is a key component to communications within Odyssey, whether that's to your clients, or your own staff.
Notes - Office: These notes are purely for your own internal reference, and will never be used in external communications. If this note is important to see each time you make a booking with this provider, put a tick above the note.

This note will then pop up like this each time you make a booking using this provider

Notes - Driver: Record any notes that are driver specific, e.g. bags are stored under the main reception counter.
Learn more about Itinerary construction Here
Emails
Bulk emails can be sent to this provider for combined groups, and history viewed, via the Provider | emails tab.
To view email history for a Provider
- From the Main Menu | Provider | list, click on a Provider, and navigate to the Emails tab
- Email history for this provider can be viewed in this screen.
- It lists a subject line, MailJet ID, the date sent, who the sender was, the time, and what Merge tabs were included in the email.
Learn more about sending Bulk / pre season emails to Providers here
Learn more about sending emails Here