
Creating a New Booking
A booking is a clients booking on a Tour. It holds all the client details for this trip, along with their preferences, travel details, finances, etc.
- It is the fourth level (L4) in the Data Structure of Odyssey.
- Learn more about how other Odyssey clients might label their L4's here
- Bookings can be added to a tour when the tour is created, added manually later, or added via the import booking process.

After you have created a Tour/Departure, to add new Bookings
There are multiple ways to add new bookings.
1. Navigate to the appropriate Tour/Departure and from almost any menu option on the left hand side, click the + Booking button.

OR
3. From any booking on the departure, click the "More Actions" buttons and choose + Booking. Learn more Here

You will be presented with the option of choosing a customer who is already in your system.
Begin typing their name in the search box, and if their name appears in the list, click on the tick checkbox to select it. Then click the Continue button

If the customer's name is not in your Clients list, click the Not a previous Client? Add them now > button

Create a new client on the fly, by adding limited details. You can go back and complete more details for this contact later. Learn more about client management Here

For each new booking, work through the tabs systematically, starting with the Details Tab.
Details
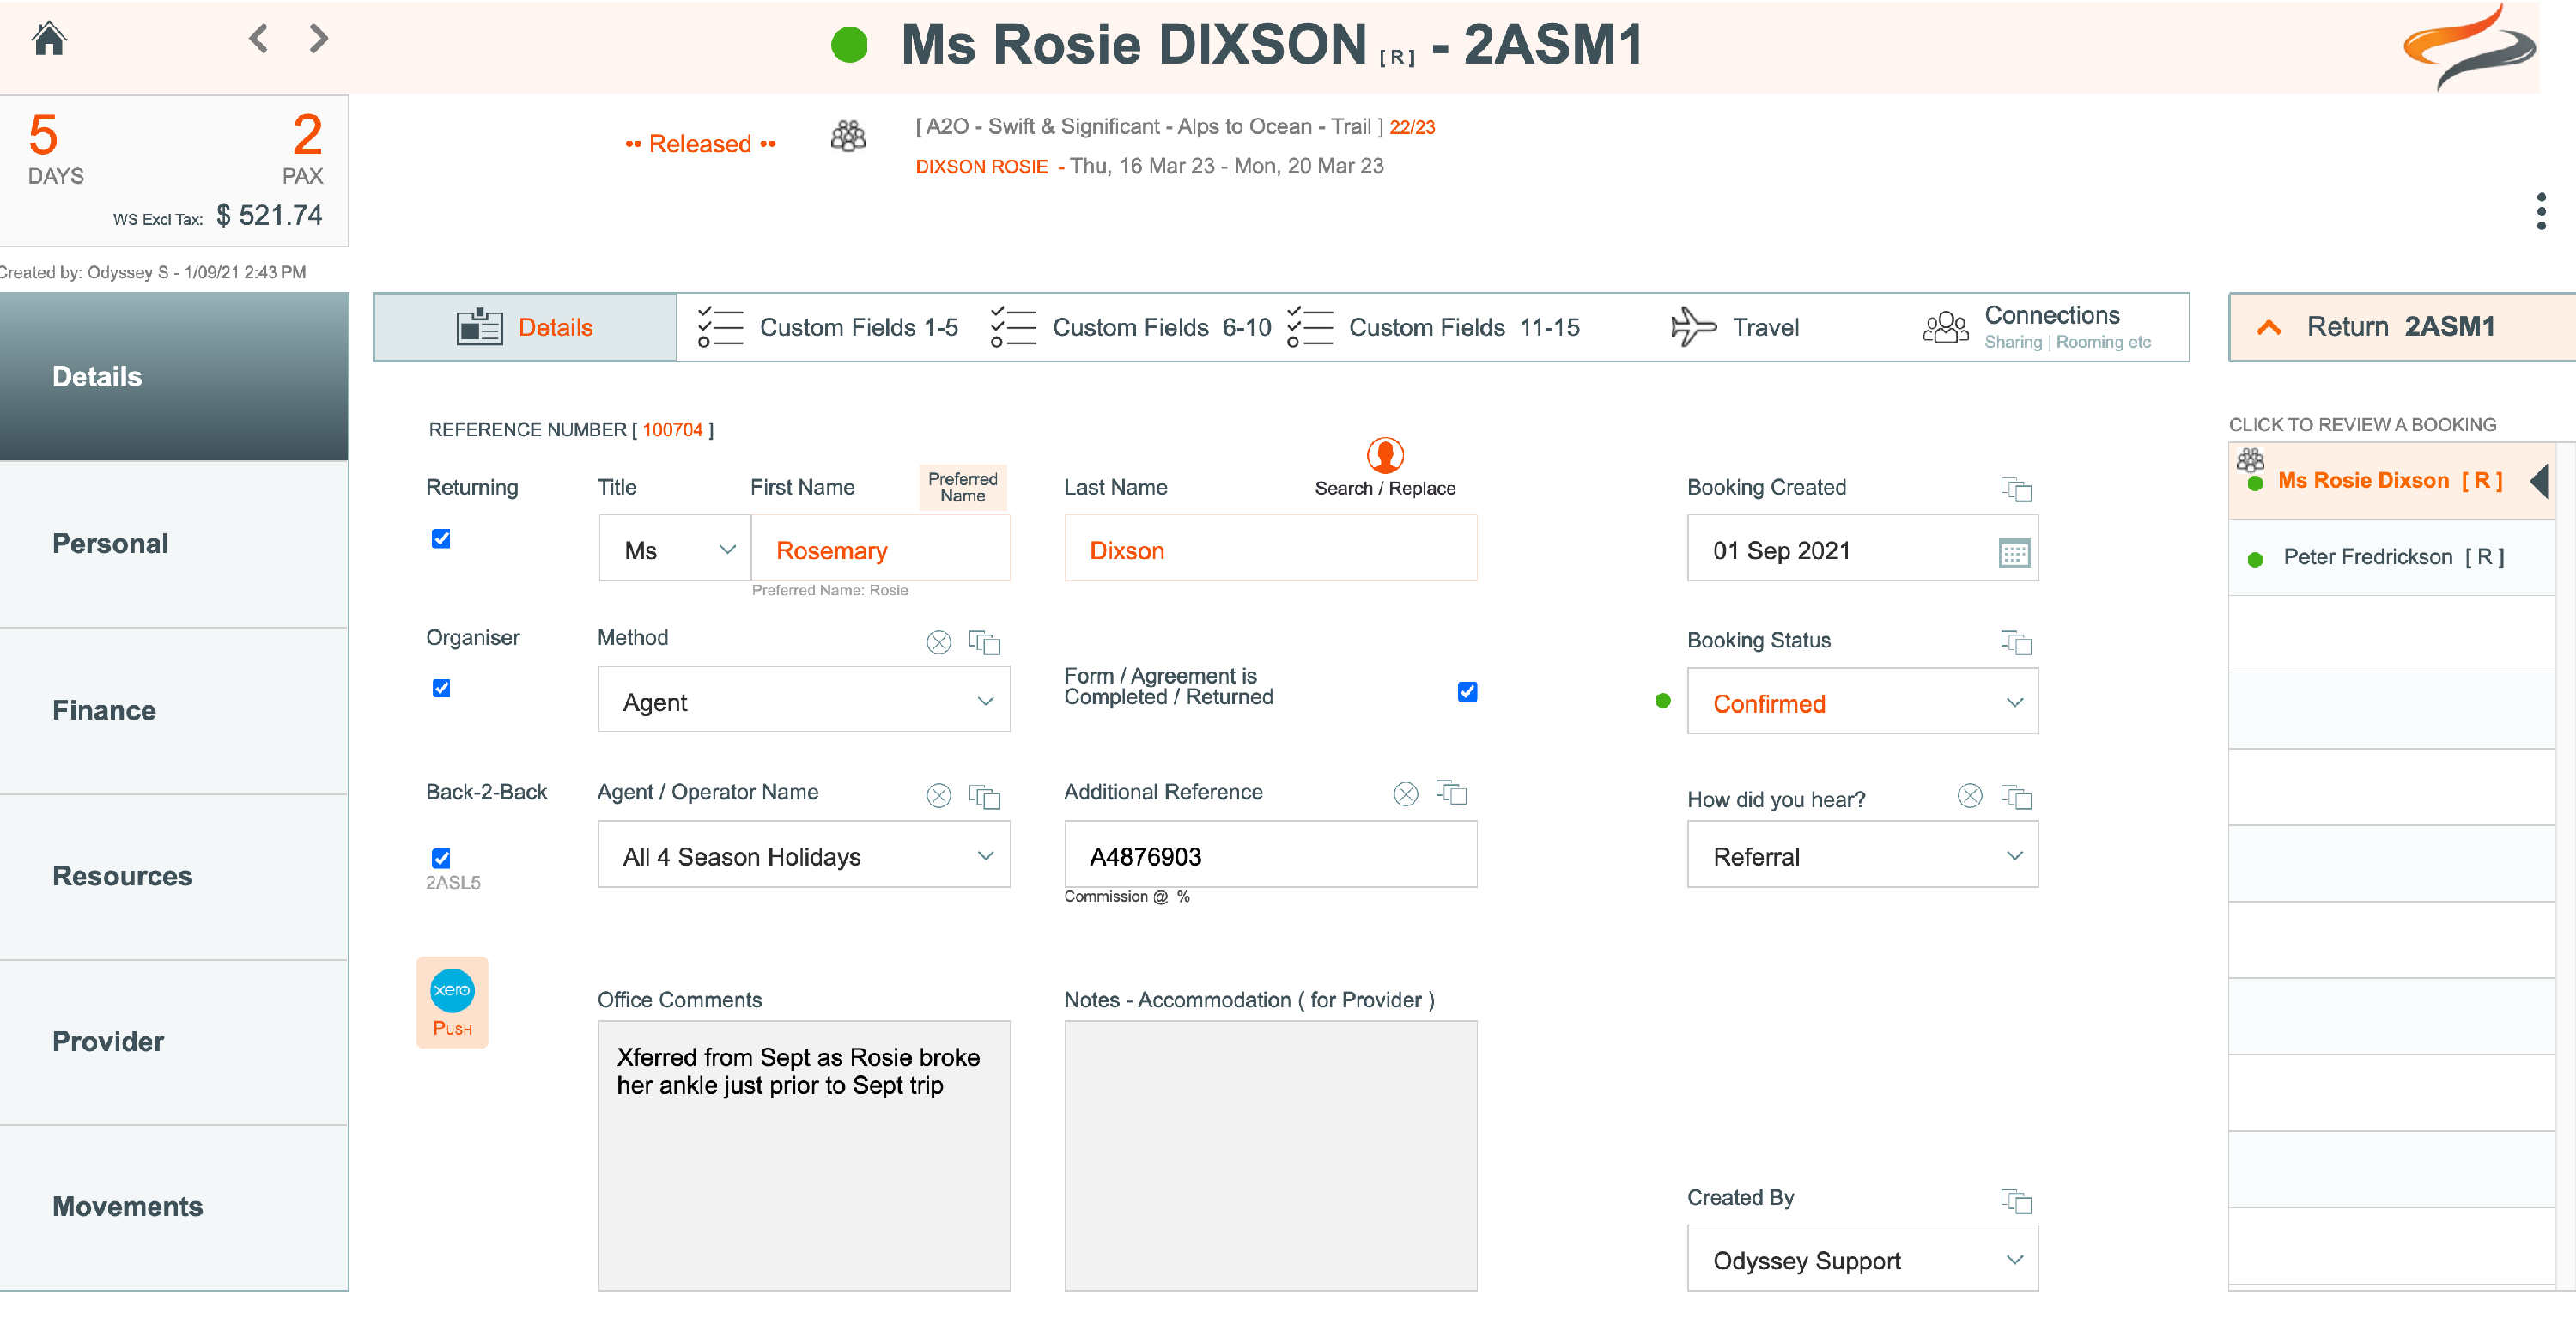
- Returning customer: Learn more about the returning customer tickbox Here
- If the person is the organiser of this departure, tick the organiser check box.
- Note that the organiser now has a multiple person icon beside their name. More than one person can be an organiser in a Departure. For example, each family might have designated one person as the organiser for their family in a group booking.
- Note that as well as the First Name and Last name, you can also specify a "Preferred name" for your client. So, if a client's full name is Terrence John, but is known as John, enter John as his preferred name
- Choose the Method which they came to you, and if by Agent, enter the Agent name from the drop down list below that. (If you don't see the agent field, the VIEW to that may have been turned off in the Master that this booking is based on. Learn more about Masters Views Here)
- For Odyssey clients who use the Advanced Module of Cognito Forms / Waivers: You probably don't have their waiver form yet, but note that this is the tab where you will tick that when it has been received.
- If the client on this booking is doing more than one Departure with you at this time, then tick the Back-to-back checkbox. Do the same thing on the next Departure.
- Write any internal notes regarding this booking in the Office Comments field. This could say "doing 3 back to back tours with us", or "transfer from July", or "friends of Joe Bloggs". This note is for internal usage only, and will also display on the Departure's Booking record.
- The Created by name - If the Booking is created on the SAME DAY as the Trip is created, then it will pull thru the Trip staff member name. Otherwise - if the Booking is created the next day, or any other date in the future after that... the name of the person who is the logged in user creating the Booking will be used instead.
Custom Fields
Custom Fields 01-05, Custom Fields 06-10, Custom Fields 07-10, Custom Fields 11- 15
The purpose of these fields is to store up to fifteen fields of TEXT content that is submitted to/from the Client Details form in Cognito Forms.
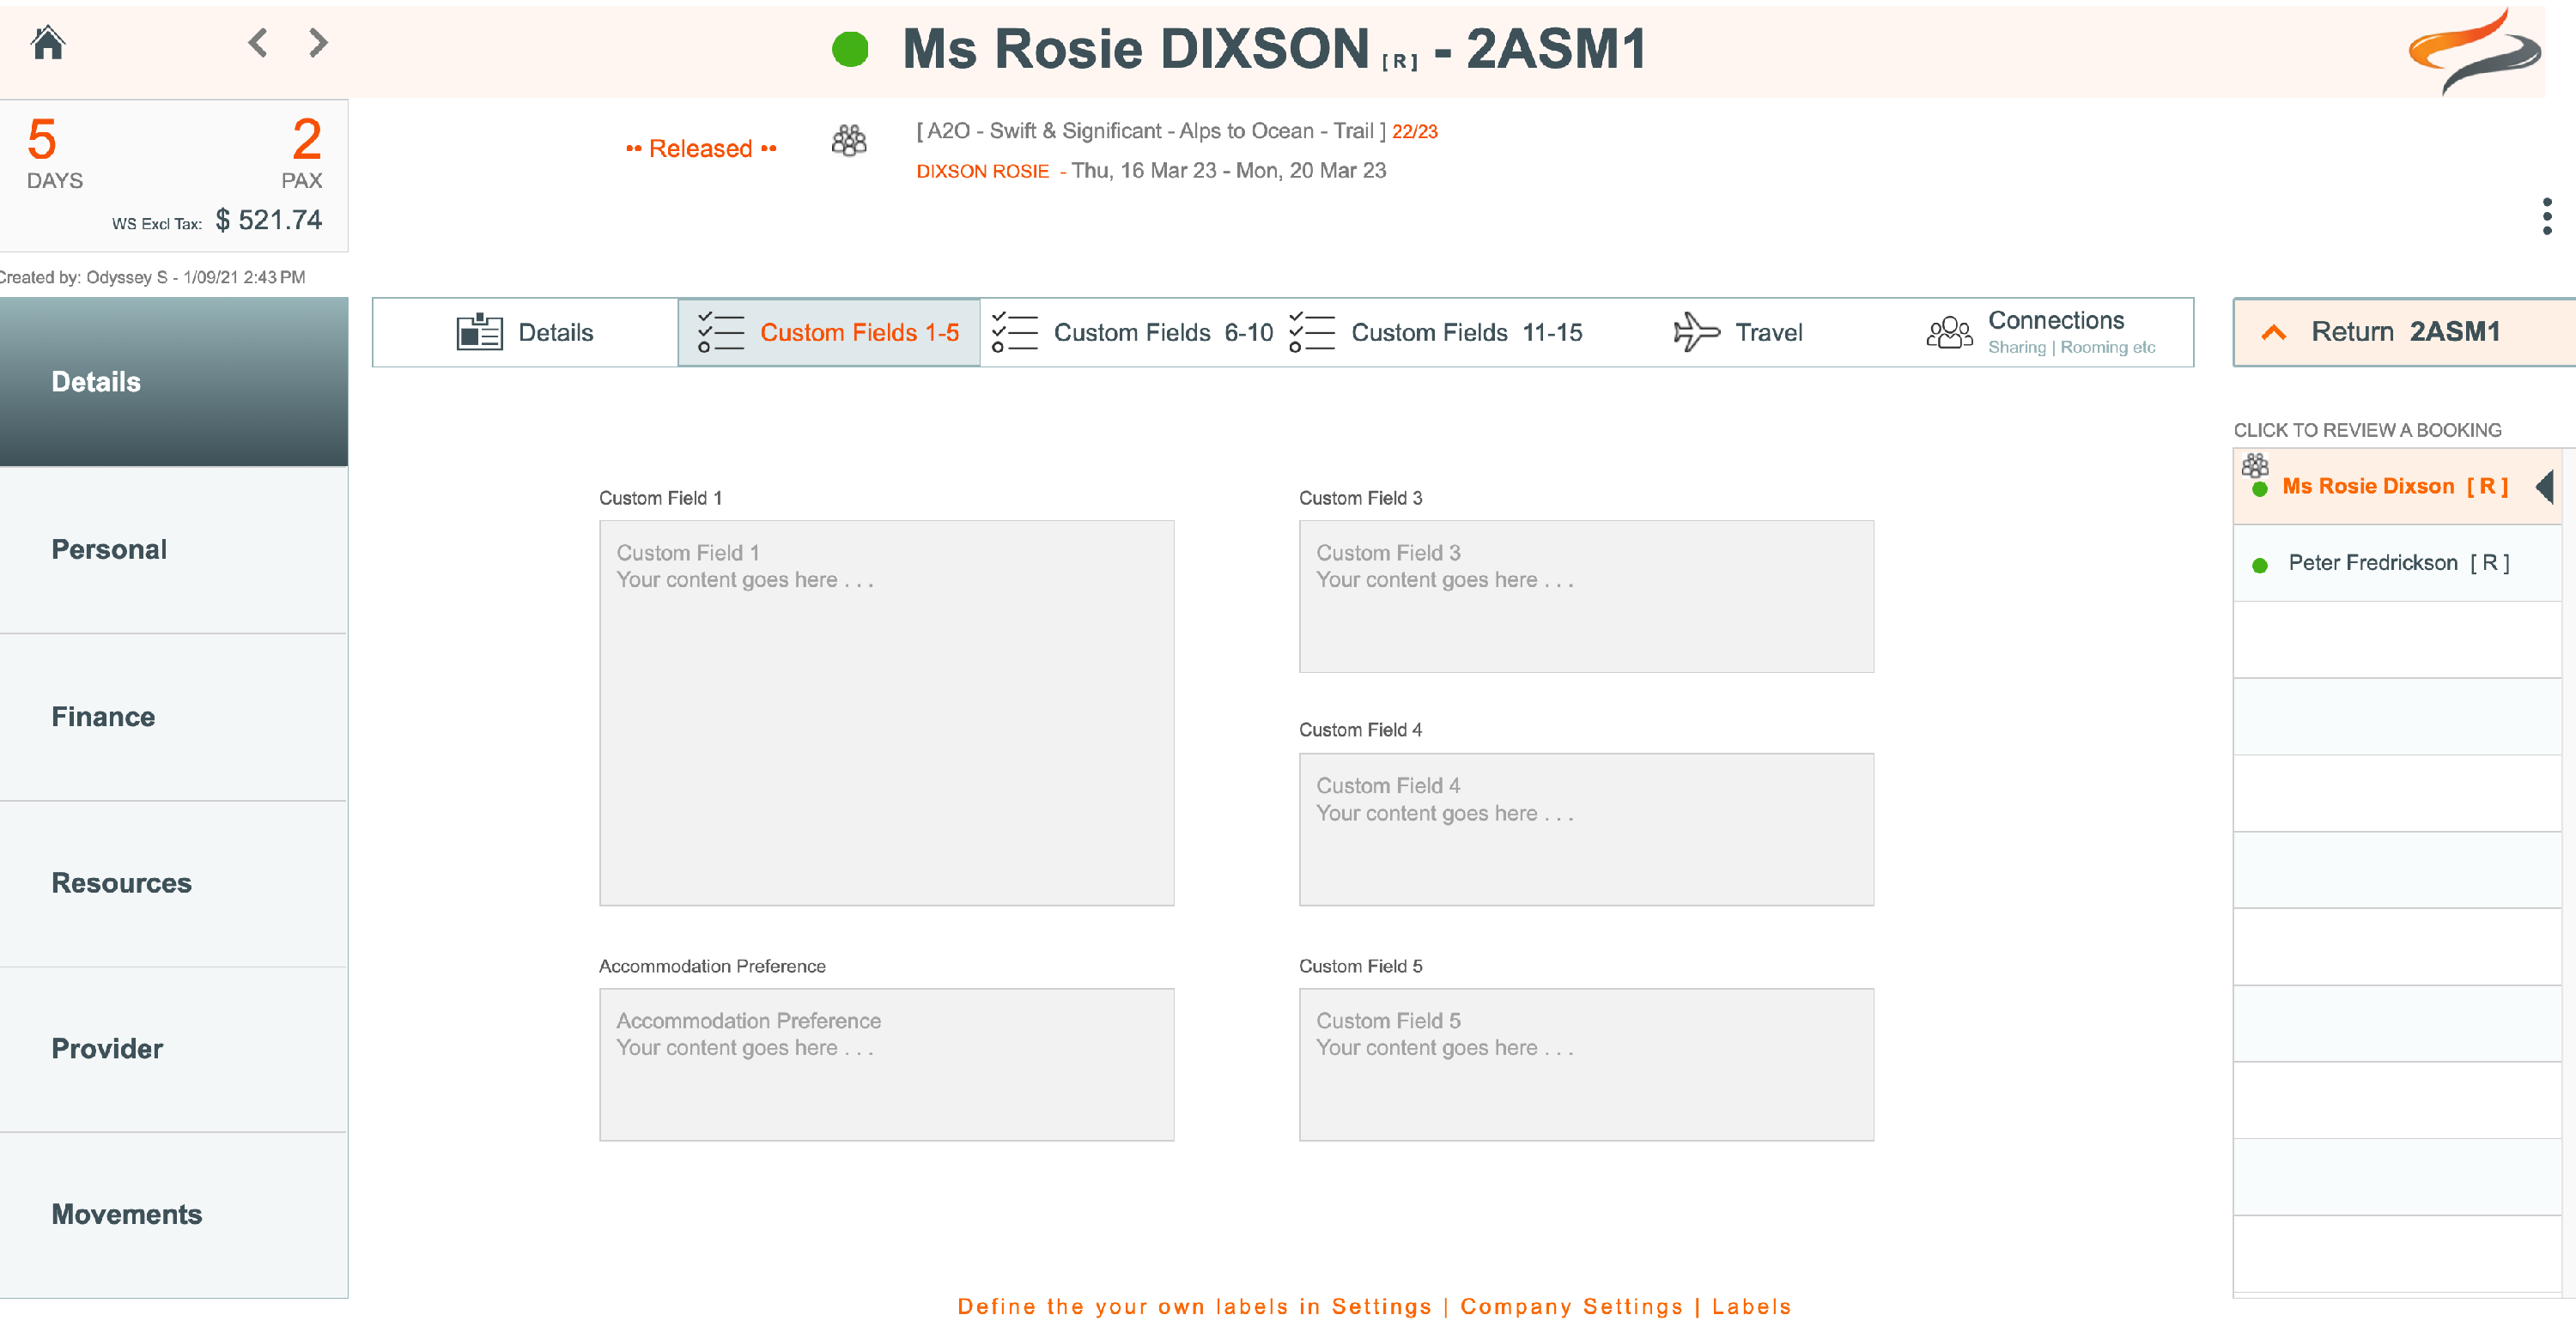
Each Tour | Booking (Guest/Passenger/Booking) record has up to 15 custom fields which can be used to
a) store data that is synchronised with 15 custom fields in the Cognito Client Details Form (if your business uses this Advanced module. These records can be very specific to your business, or your client, such as wheelchair dimensions, or what menu selections they would like to make on their tour. or
b) to store other data you might be interested in keeping, in relation to this client. These additional client specific fields can be labelled with names of your own choice, in Settings | Labels. Learn more about Label settings here
Connections
Learn about the Connections view here
Travel
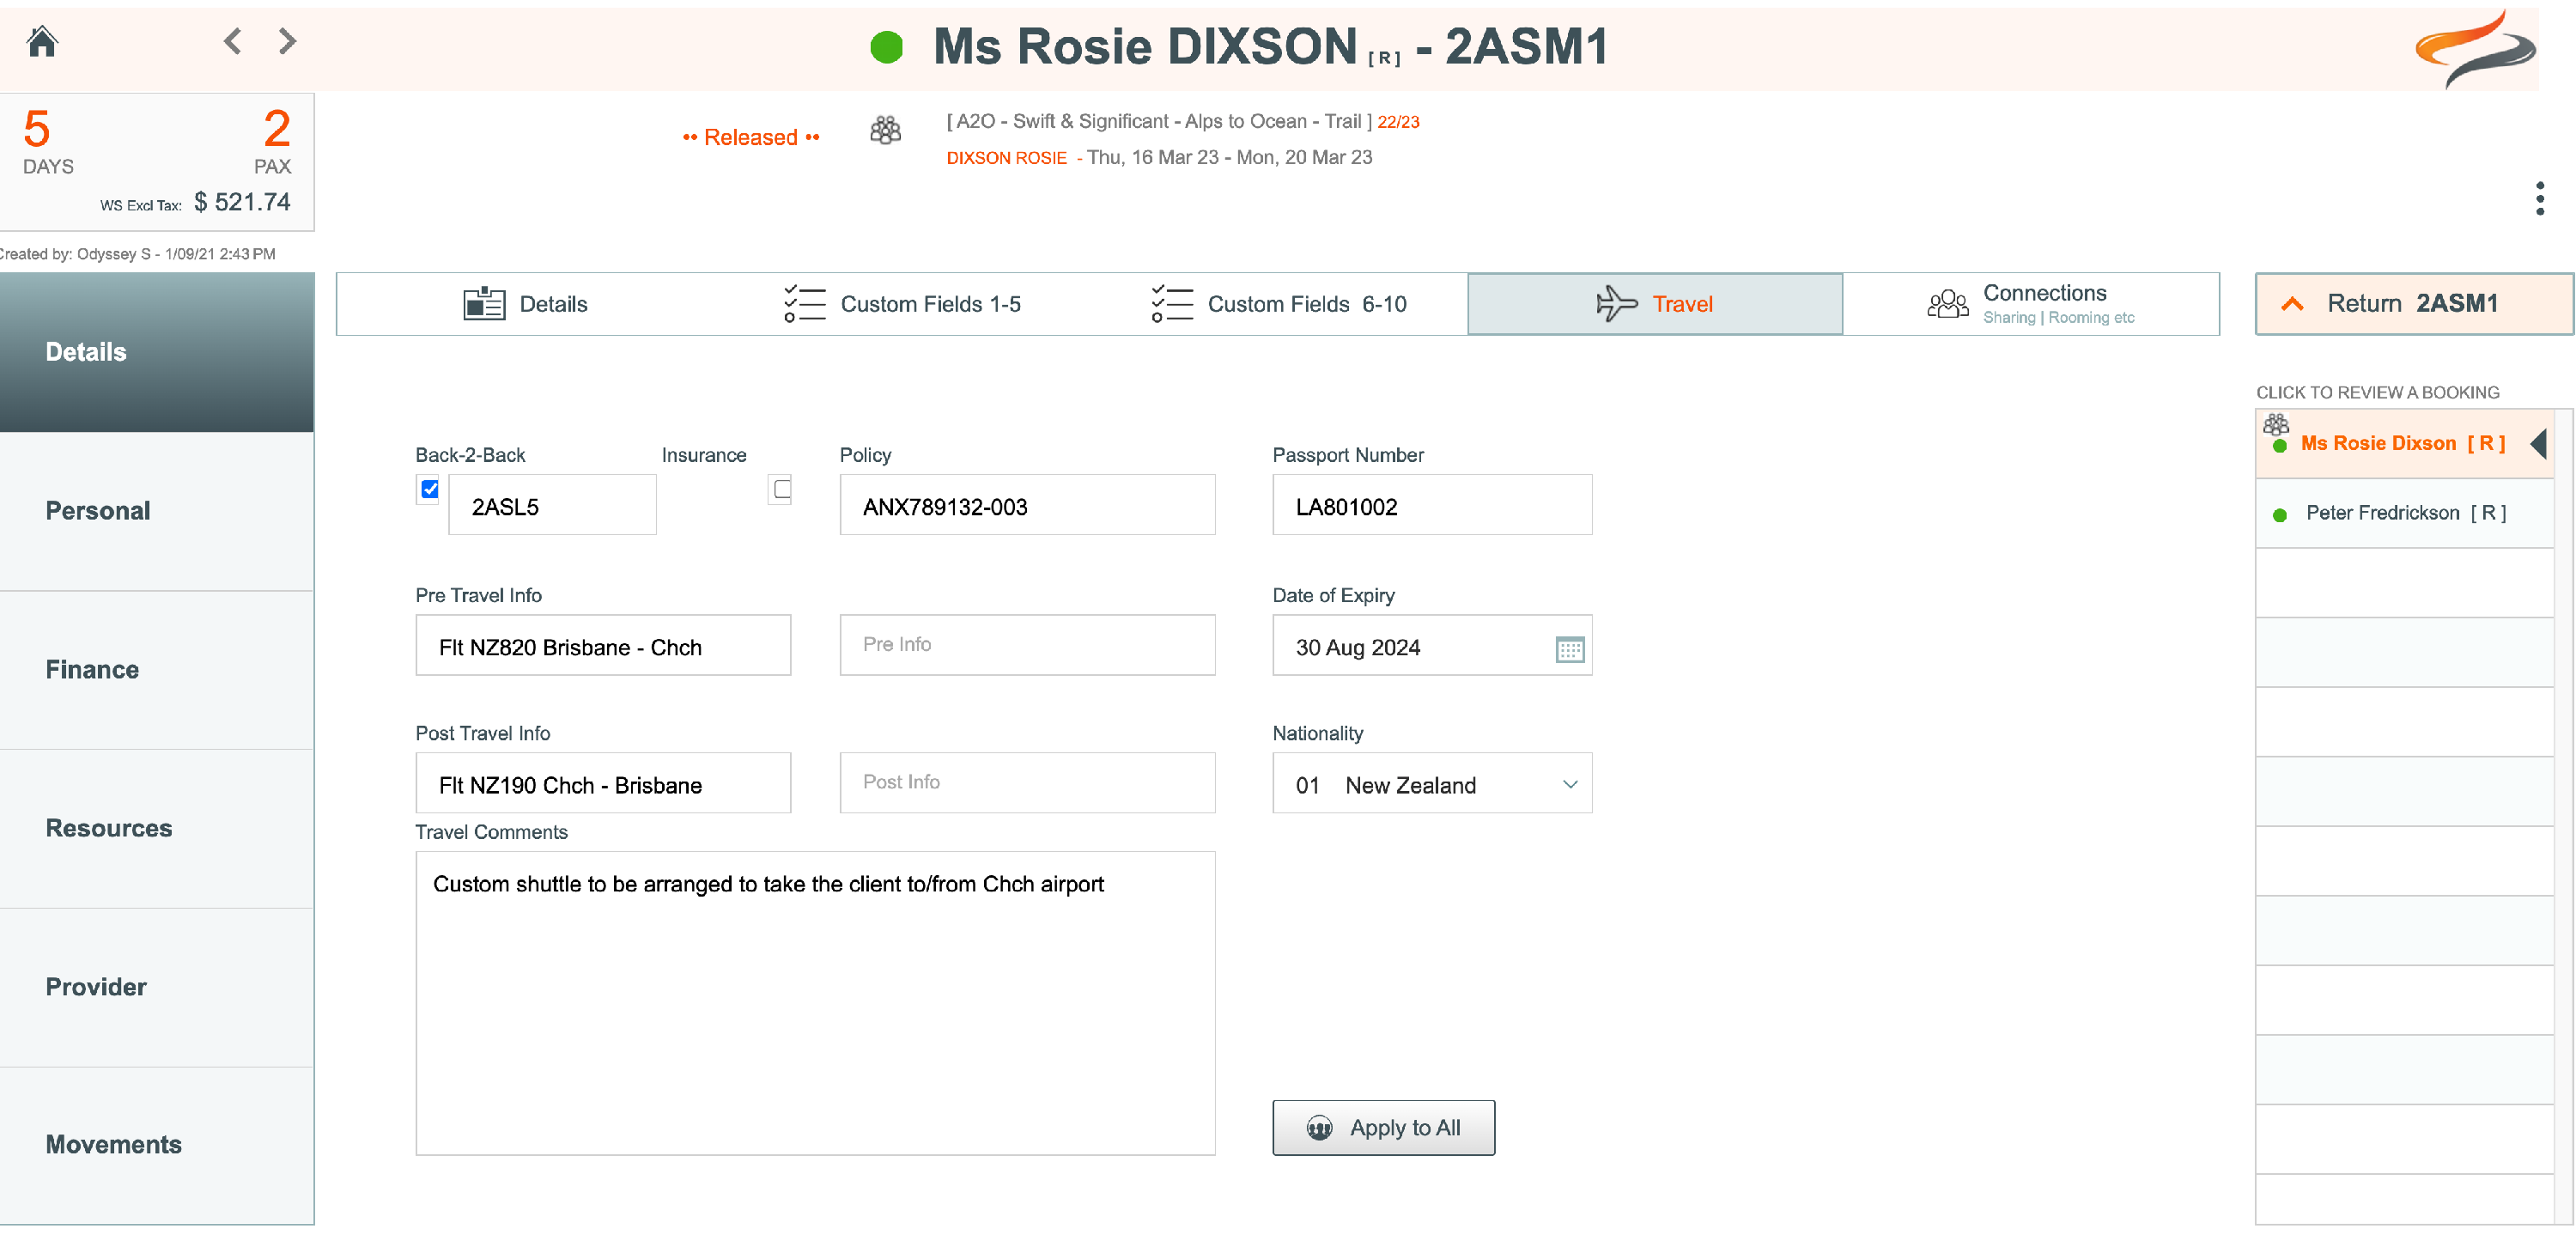
- Back to Back: If your client is doing more than one with trip you on this occasion, you can store the trip code of the next or previous trip here.
- It's also a good place to store travel documentation such as insurance policy details, passport number, date of issue, , along with the customer's Nationality.
- There are some free form fields for you to enter pre and post travel details such as - "arriving from Perth on Saturday 17th, being collected by family and delivered to Haka lodge in Queenstown the night before travel".
Connections
Learn more about the connections view here
Personal
Contact

- On the Contact tab, Enter contact details for the Client, including email, mobile, and address.
- Choose their Nationality from the dropdown list. When the Nationality is selected, it will automatically make the same selection for the Country of Residence, but this can be overriden if required.
- Select the client's preferred Language, if this is required. Coming Soon - Some outputs can be translated into the client's preferred language.
- Some Odyssey Clients only wish to send SMS texts to the group organisers, or perhaps one partner in a couple. By ticking the "Include in SMS automations" tickbox on the Tour | Booking | Personal | Contact tab, you can include or exclude specific clients in the SMS automation process. (There may be a company setting for this..) A SMS text will not be sent to a booking unless their status is "Active / Confirmed"
Odyssey Customers who are part of the World Expeditions Group can also use the Include in CRM tickbox. To learn more about this functionality, click Here
The Copy and Paste buttons can be used to Copy address details from one Client Record to another. Simply click on the Copy button once you have filled out the address details you want to use, and then navigate to another client record (possibly by using the client list on the left hand side), and then press Paste.
Medical
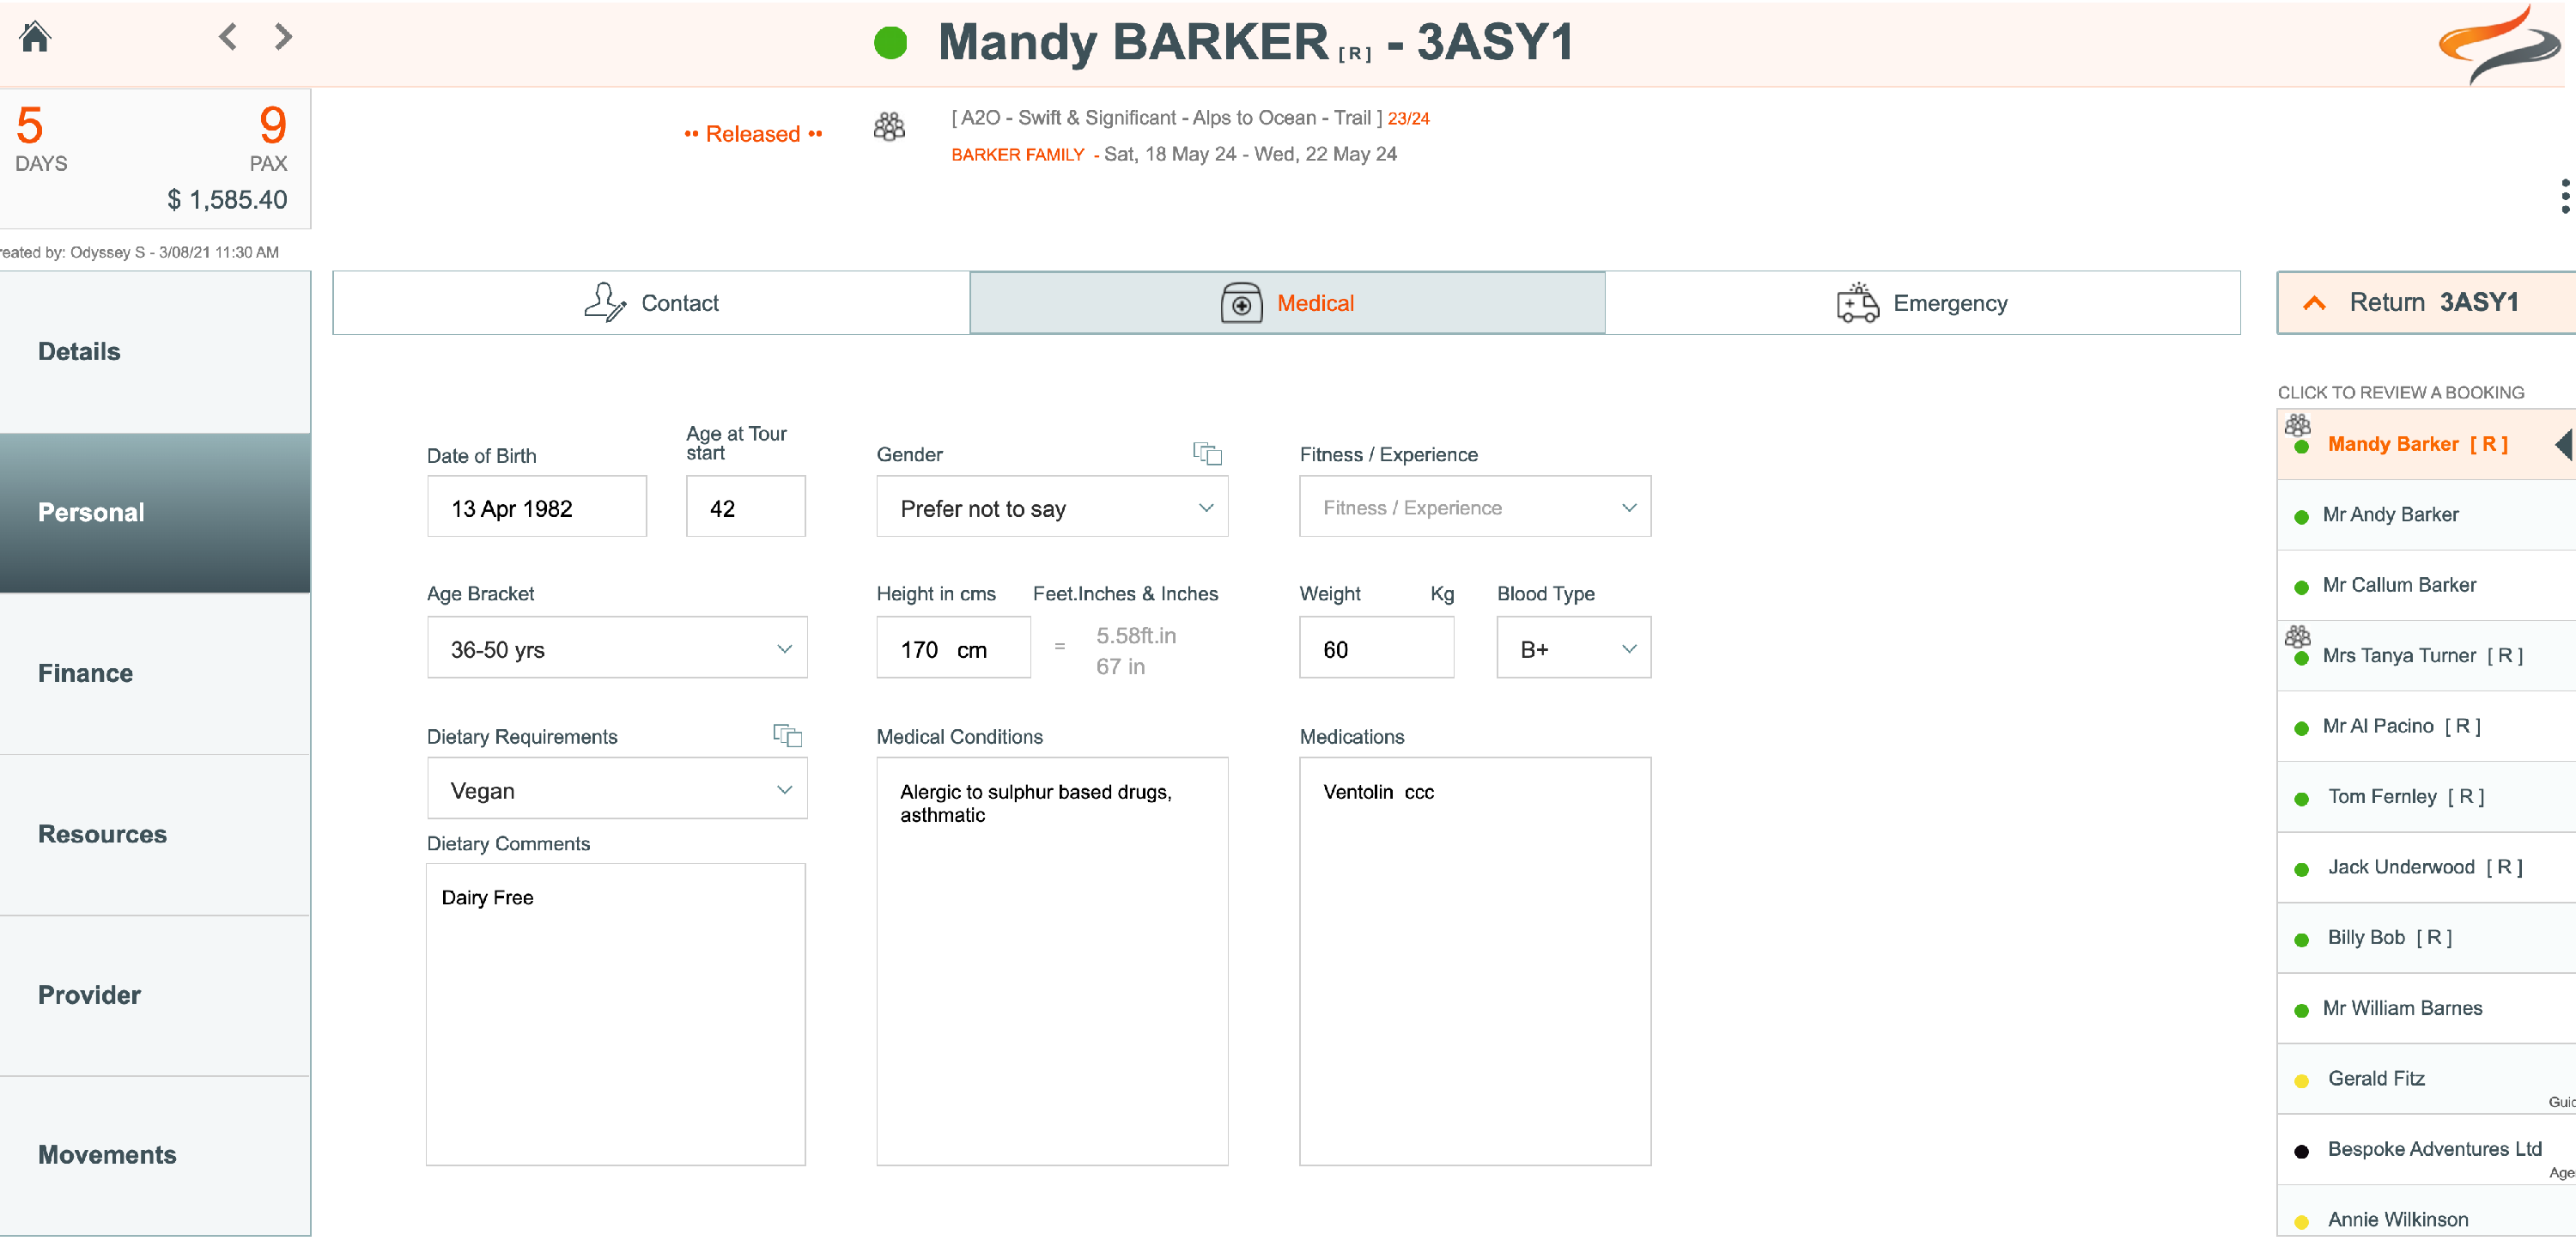
- On the Medical tab, enter the Client's Date of Birth, and their age field will be calculated.
- Choose the Client's Age bracket from the drop down list.
- Choose the Gender of the client, (Male/Female/Neutral).
- To enter the Client's Height, choose from one of the three drop down lists.
- The first drop down list (Height cm 140-200), sorts the most common heights from the shortest to the tallest measurements. The second drop down list (Height cm 200-140) sorts the most common heights in reverse order - tallest to shortest. The third drop down list (Height cm [Others] lists all heights from 220-120
- Enter a Client's Dietary requirements from the drop down list, if they have any. To learn more about this setting click Here
- Enter a Client's Medical Conditions in the free form field, if they have any
- Enter a Client's Medications in the free form field, if they have any
- From the drop down list, choose the Client's Fitness/Experience level
Emergency
The emergency tab allows you to store up to two emergency contacts for each client, along with their relationship, phone and email address details.
Note: Anything added here becomes a permanent record on your client record

Finance
Charges | Discounts

- The Finance | Charges | Discounts record for each client booking on a Tour lists all of the Costs assigned to the Tour
- The cost for each item is displayed, and is editible
- A tick indicates if the Charge should be applied to this client booking
- A tick indicares if this charge should be included in Agent Commission
- Any notes which have been entered will also appear
To learn about editing these records, click here
Paying for

The Paying for Tab on the Booking | Finance record indicates who this person is paying for, along with the total costs, deposit required and balance owing.
Learn more here
Payments

The Booking | Finance | Payments tab displays all payments made by this client on this tour.
- If a description has been entered, e.g. Deposit, Final Payment, etc, then it will be listed
- the date the payment was received
- whether a credit card fee was included in the transaction
- the amount of the payment
- Any relevant notes recorded at the time the payment was made
- If the First Paid tickbox was ticked when the payment was made, then the "First Paid" tickbox will have a tick on this tab
- Add more payments made by this payer, by clicking the + Payment button
-
For Odyssey clients who use the Xero Intregration Advanced Module, click the Pull payment records button to pull through to Odyssey any payments that have been entered in Xero
Learn more about Xero integration here
-
If this client's booking status has changed, select a different choice from the drop down menu
Learn more about booking status here
Subtotals

- The Booking | Finance | Subtotals view provides a summary of all of the relevant costs for this client alone, and also as the payer for other clients.
- The first row shows costs for this client only
- The second row shows costs for this client, and other bookings that this person is a payer for
- The totals are for Costs and Discounts, resources, each provider type, each movement type,
In the total box, a sub total of this payer's total costs are shown, along with the calculated deposit less any money paid, the amount paid, and the balance owing.
- GST Inclusive or Exclusive values can be displayed, by chosing the relevant radio button
Totals

All Totals

For help on Booking level Allocating Resources, Providers, Movements, Itinerary and Communications, please see links listed below.