
Tour / Departure - How to send and monitor emails
A third party product, MailJet, handles the layout and sending of your emails.
Odyssey provides you with the ability to send time based and monitorable emails via MailJet; this ensures emails are sent on time, and gives you visual tracking display of emails within Odyssey.
See the bottom of this page for links on how to set up MailJet. This article is designed to show you how it works on a daily basis within Odyssey.
Sending emails
At reservations level, each Departure has an EMAILS tab which allows you to send Provider, Finance and Customer Service emails.

Depot staff have their own EMAILS tab also:
Note
- if an email template name is coloured orange, you have chosen to monitor that email template. Learn more about email indicators Here
- if an email tickbox is shaded orange, it means it is overdue. Learn more about overdue emails Here
Here are a few shortcuts to help you move around this document quickly:
Learn how to send Provider emails
Learn how to send Finance emails
Learn how to send Customer Service emails
Learn how to send Depot/Operational emails
Learn why some tick boxes don't show in order for you to send your emails? Click Here to learn more
Learn about the Status of your sent email
Learn about Resending An Email
Learn about storing Paperwork
Learn about including Attachments
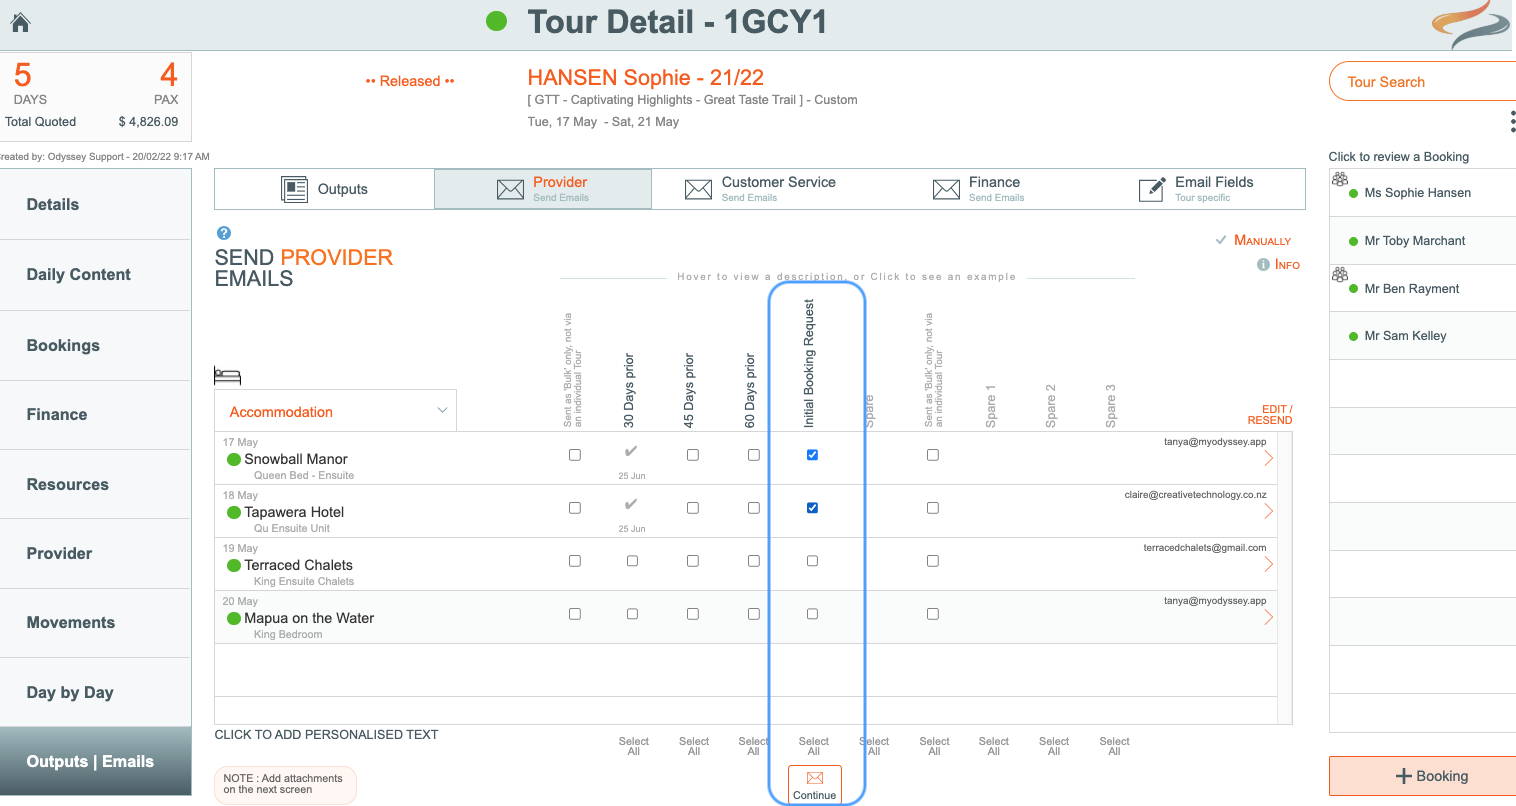
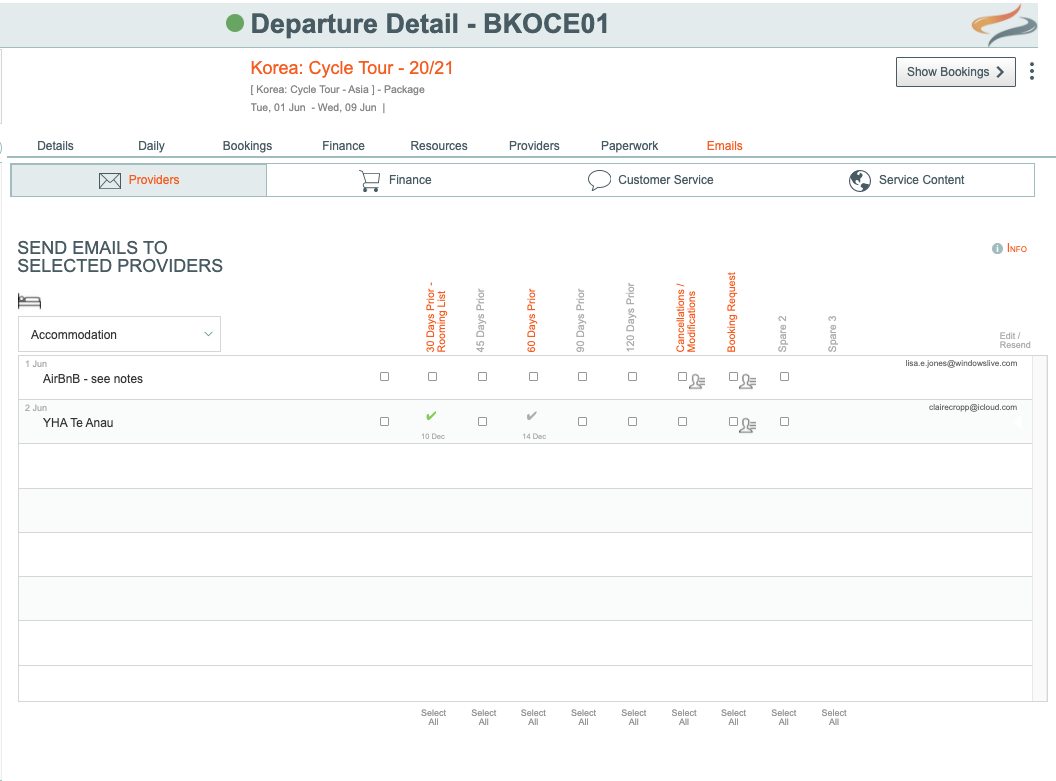
To send an email to a Provider
Provider emails allow you to automatically send emails to Providers for individually selected clients, or all clients on the Departure, regarding the status of their Provider's booking, e.g. an initial Booking request, a rooming list, or a 60 days prior reminder.
- Navigate to the specific Departure's | Email | Provider tab
- Provider email templates are listed across the top of the date line entries
- Select the provider type from the drop down menu, e.g. Accommodation, Activity, Meals, or Other

- Each day of this departure has its own line record, one line for each accommodation provider. Tick in the date line for an individual Provider, in the appropriate column for the email template you wish to send
OR
- Click the Select All button, under the specific email template you wish to send
- Click Continue
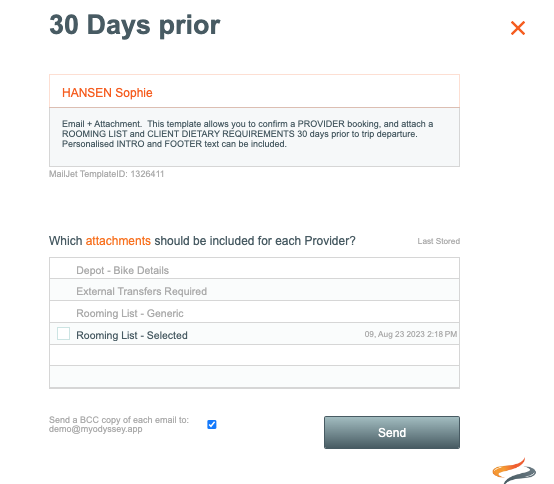
- A dialogue box will appear, reminding you of the name of your booking, and the MailJet template ID (learn more about MailJet from the link below) which will be used to send your email.
- Select an attachment to be sent with this email. For an attachment to have a tickbox, to enable it to be selected and sent with the email, the attachment needs to have been STORED first. (Learn more about storing Paperwork, and Attachments)
- Tick if you wish a blind carbon copy of this email to be sent to your email address, for your own records.
-
Click Send
NOTE: Every unique Provider / Date email is regarded as a separate entity, so the emails set to a Provider on the same Departure, for different dates, will each be separate, and display the correct individual date.
- Multiple stays with one supplier:
- For any supplier with multiple stays (whether consecutive or non-consecutive), 'MULTI-STAY' will appear in the Supplier Emails window.
- When emailing a supplier marked as MULTI-STAY, only send ONE email. Tick only ONE of the email checkboxes in the Supplier Email window for the multi-stay suppliers.
-
This applies even when the stays occur at both the beginning and end of the tour.
-
An alternative method of emailing a provider is from the Provider Record. The following method is ideal for communicating a combined number of departure requirements to the provider.
Providers
From the Main Menu | Provider list, select a Provider, and navigate to their Comms tab. Each Provider has a Comms tab like the one below. From here, you can view history, or even send an email directly to the provider.

To send a combined Departure email to a Provider
Learn more about this topic Here
To send a Finance email to clients
Finance emails allow you to automatically send emails to individually selected clients, or all clients on the Departure, regarding the financial status of their booking, e.g. Deposit required, or Balance payment received.
- Navigate to the specific Departure's | Email | Finance or Various Tab, wherever your Finance emails are stored
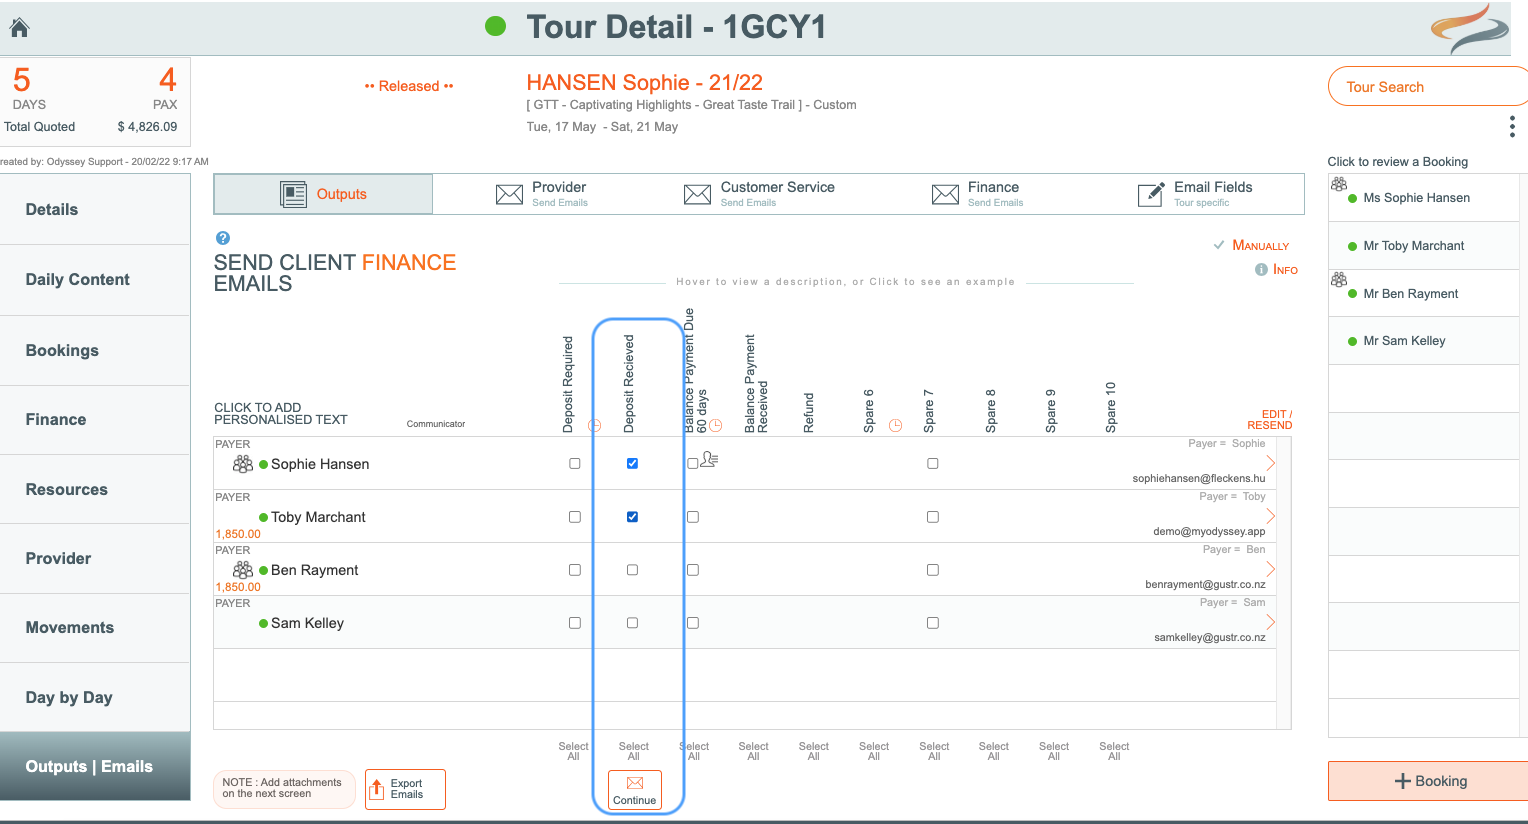
- Finance email templates are listed across the top of the date line entries, with one record line for each individual client
-
Tick in the individual client record line to select which email template you wish to send, eg Deposit
required, or Deposit received
OR
- Click the Select All button, under the specific email template you wish to send to send the selected email to all the clients on this booking
- Click Continue

- A dialogue box will appear, reminding you of the name of your booking, and the MailJet template ID (learn more about MailJet from the link below) which will be used to send your email.
- Select an attachment to be sent with this email (Learn more about storing paperwork, and attachments). Note: If the attachment has not already been saved, it's description will be in grey and you can't select it. You will need to go back and store the attachment and begin this process again.
- Tick if you wish a blind carbon copy of this email to be sent to your email address, for your own records
- Click Send
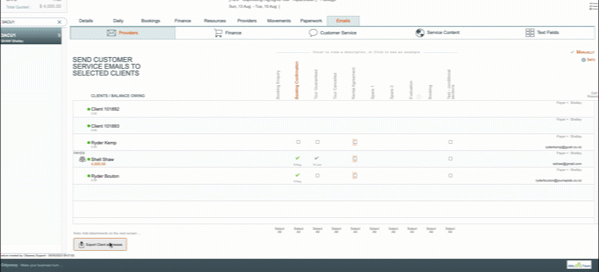
To send a Customer Service email to clients
Customer service emails allows you to automatically send emails to individually selected clients, or all clients on the Departure, responding to booking enquiries, booking confirmations, waivers, and tour evaluations.Navigate to the specific Departure's | Email | Customer Service tab
- Customer Service email templates are listed across the top of the client line entries, with one record line for each individual client
- Tick in the individual client record line to select which email template you wish to send, eg Booking enquiry, or Waiver
OR
- Click the Select All button, under the specific email template you wish to send to send the selected email to all the clients on this Departure
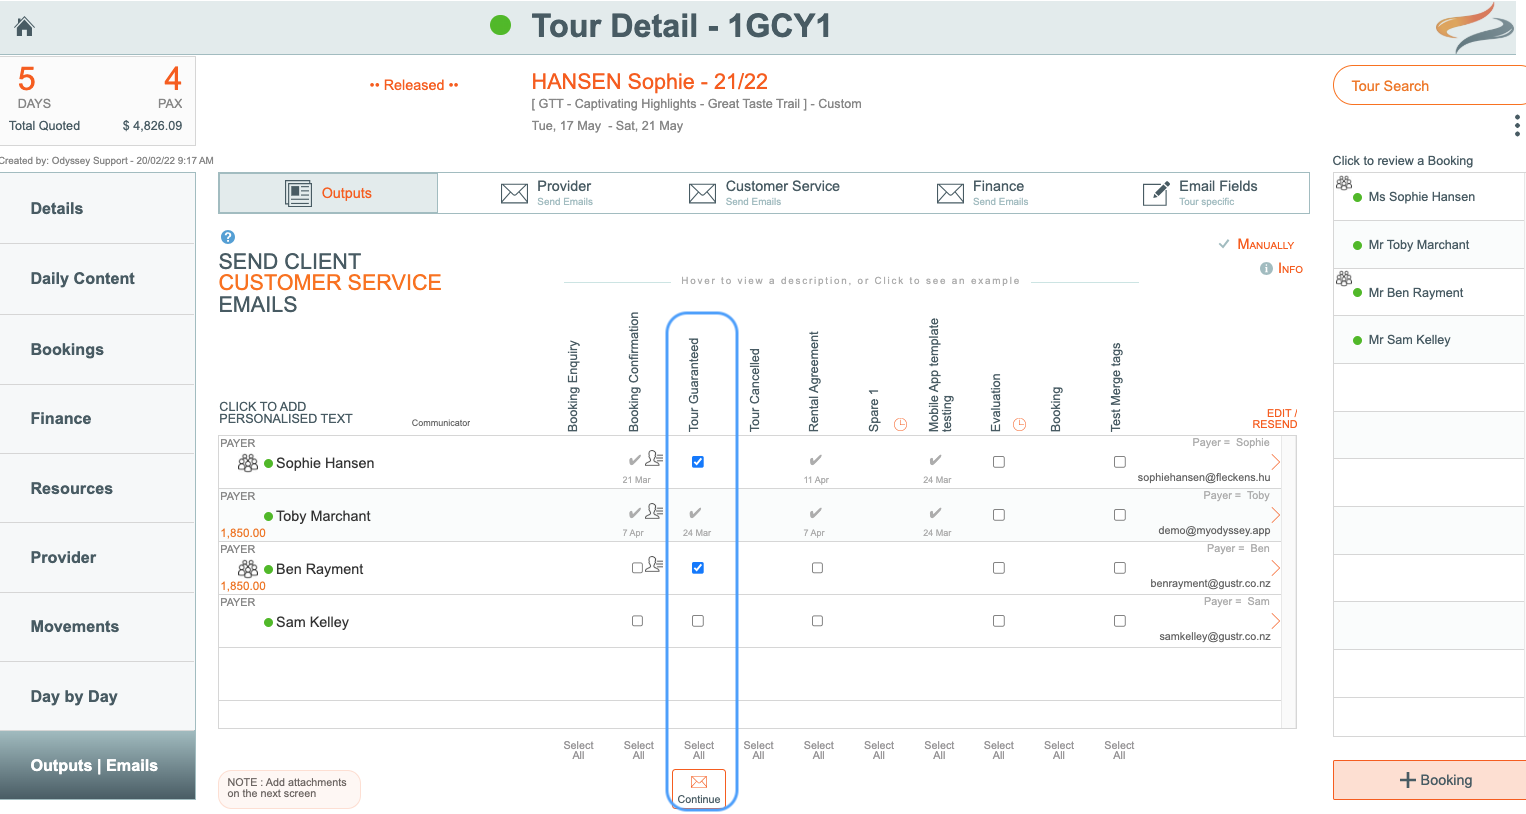
- Click Continue

- A dialogue box will appear, reminding you of the name of your booking, and the MailJet template ID (learn more about MailJet from the link below) which will be used to send your email.
- Select an attachment to be sent with this email (Learn more about storing Paperwork, and Attachments). Note: If the attachment has not already been saved, it's description will be in grey and you can't select it. You will need to go back and store the attachment and begin this process again.
- Tick if you wish a blind carbon copy of this email to be sent to your email address, for your own records.
- Click Send
To send a Guide an email
Guide emails allow you to automatically send emails to individually selected, or all guides assigned to this Tour. Attached to the email you can send them attachments such as the Client Details List, and a Departure summary, to assist with smooth hassle free communications with providers and clients.
Navigate to the specific Departure's | Email | Customer Service, or Guide or Various tab - whereever your Guide emails have been stored.
- Guide email templates are listed across the top of the guide or client line entries, with one record line for each individual client
- Tick in the individual guide record line/s to select which email template you wish to send, eg Guide - Pre Trip email
- then click Continue

- A dialogue box will appear, reminding you of the name of the Tour and the MailJet template ID (learn more about MailJet from the link below) which will be used to send your email.
- Select an attachment to be sent with this email (Learn more about storing Paperwork, and Attachments). Note: If the attachment has not already been saved, it's description will be in grey and you can't select it. You will need to go back and store the attachment and begin this process again.
- Also, if attachments have been saved, this email and the saved attachments can be sent automatically; check out your email settings here
- Tick if you wish a blind carbon copy of this email to be sent to your email address, for your own records.
- Click Send
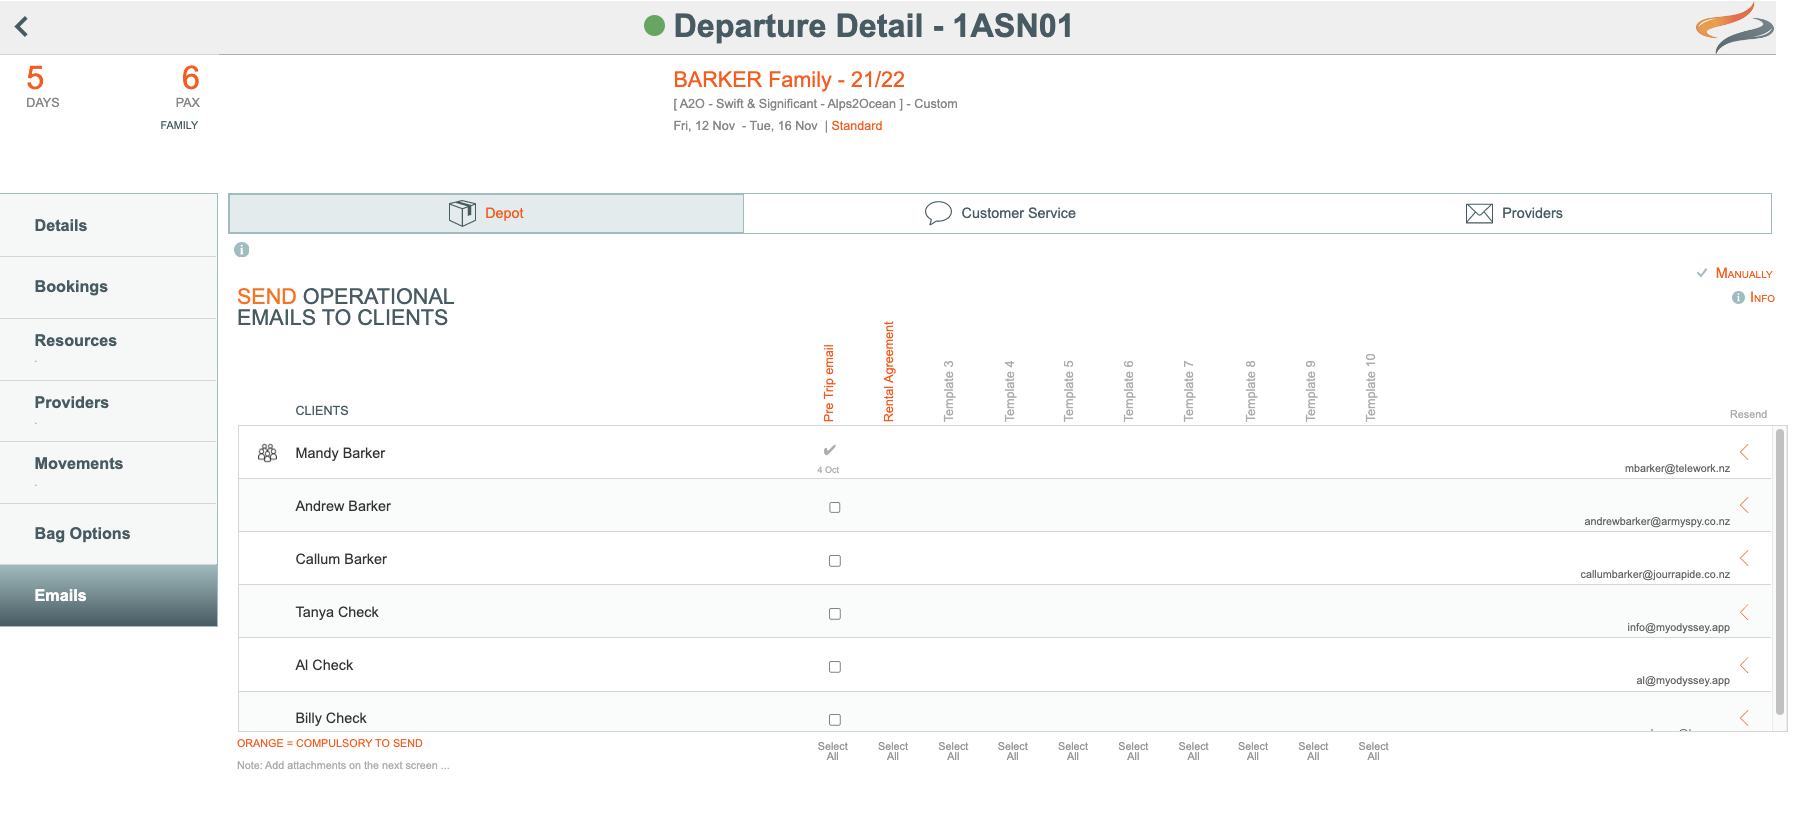
How to send a Depot email
Depot, or Operational emails allow you to automatically send emails to individually selected clients, or all clients on the Departure. You can choose from a range of email templates, including Depot, Customer Service and Providers.
- From the Depot Dashboard List
-

Depot Dashboard list
- Click once onto your selected Departure
- Navigate to the Email tab

- Depot, Customer Service, or Provider email templates are listed across the top of the list, with one record line for each individual client
- Tick in the box on the specific client record line to select which email template you wish to send, eg Welcome to the trail, or Waiver
OR
- Click the Select All button, under the specific email template you wish to send to send the selected email to all the clients on this Departure. Note: If the attachment has not already been saved, it's description will be in grey and you can't select it. You will need to go back and store the attachment and begin this process again.
- Click Continue
- A dialogue box will appear, reminding you of the name of your booking, and the MailJet template ID (learn more about MailJet from the link below) which will be used to send your email.
- Select an attachment to be sent with this email (Learn more about storing Paperwork, and Attachments)
- Tick if you wish a blind carbon copy of this email to be sent to your email address, for your own records.
- Click Send
Service Content
Learn more about the service content field Here
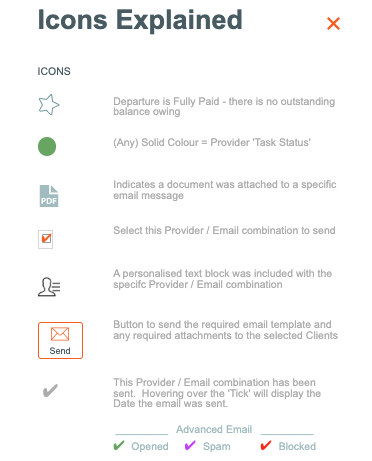
Email Status
When you have sent an email, there will be a grey tick in the space where the box was previously

To learn more about the status of your email, click on the Info button at the right hand side of the window

A pop up window will appear, explaining the various icons and email status'. If your business has the advanced email function, live tracking will show you by the different colours of the ticks, whether the email has been opened, bounced, or marked as SPAM. Learn more about that Here

Depending on your access privileges there may also be a button to export these Client records to a .tab file, so meet some other internal needs. Simply click the Export Client Addresses button, name the file, click ok, then click the download button.
Help
Clicking the small 'i' button to the left edge of the window will create a pop up window to take you directly to email pages in our Help system
Useful links to other Email Features
Learn about the Service Content and Text field settings Here
Learn how to mark emails as having been sent outside of Odyssey, click Here
Learn how to have reminders that emails are due to be sent, click Here
Learn how to customise and personalise your emails, and include attachments Here
Learn how to have live tracking of emails, to see when they have been opened, bounced, or marked as SPAM Here
Learn about the Service Content and Text field settings here